

Best Thermal Imaging Camera for Home Inspection in 2026
Updated for March 2026.
A useful inspection depends on how the camera handles the work: clear, interpretable thermal patterns, adjustable emissivity, and readings collected under suitable conditions. Follow a consistent procedure and treat the image as a screening result, not a diagnosis. ASTM C1060 practice for insulation inspections provides guidance for inspecting insulation in building envelope assemblies. For suspected moisture, check the area with a moisture meter and compare readings rather than relying on color alone.
Thermal imaging can help identify areas that merit closer inspection, but it does not calculate energy savings from a single frame. A Cambridge study paired 1,725 energy-performance certificates with thermal-infrared imagery to map building energy performance and examine patterns across the existing building stock (Cambridge energy mapping with thermal imagery). That kind of mapping provides context for comparing buildings; it does not confirm what caused a temperature anomaly in one home.
Choose a camera that lets you record and review readings consistently, including emissivity settings. Scan when indoor-outdoor temperature differences are useful, then verify suspicious patterns with other inspection methods. A thermal image is a lead to investigate, not proof of a defect.
Quick Picks by Budget and Inspection Need
A dedicated thermal camera is the practical starting point for repeatable home-inspection screening. Phone attachments can help locate a suspect area, but inspection work also depends on consistent readings, emissivity control, and files that can be reviewed later. The camera identifies patterns; a moisture meter and suitable scan conditions are needed to assess whether those patterns indicate a building problem.
Price narrows the choice, but the inspection task should decide it. A low-cost unit may suit occasional DIY checks, while client reporting calls for repeatability and a user who can interpret the readings.
| Budget tier | Model or class | Reference price | Best fit | Main limit |
|---|---|---|---|---|
| Under $150 | No specific model listed | No reference price confirmed | Basic screening if a suitable model is available | Verify measurement controls and specifications |
| $150 to under $250 | MILESEEY TR10 entry-level camera; other dedicated entry-class models | TR10 listed at $199; entry-class models generally $150 to $250 (2025) | Occasional DIY screening and HVAC checks | Confirm native resolution, NETD, and emissivity control |
| About $300 | Thermal Master Thor002 | $299 U.S. (2025, TechRadar) | Budget-conscious screening with a dedicated camera | Higher price does not establish better detector performance; verify the native array and NETD |
| Professional tier | FLIR E8, Testo 868 | Current prices not confirmed | Repeatable reports and moisture-investigation work | Higher cost; results require training |
In 2025, MILESEEY listed the TR10 at $199 for home inspectors, HVAC technicians, and DIY users (MILESEEY 2025 buying guide). TechRadar listed the Thermal Master Thor002 at $299 in the U.S. and described dedicated models in the $150 to $250 range (TechRadar Thor002 review). The TR10 belongs in the $150 to under $250 tier, so the ranges do not overlap.
What each tier is actually for
Below $150, choose only if the specifications and controls are clear enough for the checks you plan to perform. From $150 to under $250, a dedicated camera can cover occasional wall, ceiling, or HVAC screening, provided it offers the measurement controls you need. The Thor002 costs more, but its price alone does not prove stronger detector specifications. Check its native array and NETD before treating it as a performance upgrade.
Professional models suit inspectors who need repeatable documentation and can interpret thermal patterns alongside other measurements. Thermal images are screening evidence, not a moisture diagnosis. Pair the camera with a moisture meter and scan under appropriate conditions; otherwise, a surface pattern may point to a concern without establishing its cause.
For a phone-connected camera, compare Android- and iOS-compatible thermal imaging cameras with handheld units, then choose based on the inspection workflow you will use most often.
Which Resolution and Sensitivity Numbers Matter
A sharper-looking image is not necessarily a better inspection. Judge a camera by the detail its detector captures, how it handles emissivity, and whether its sensitivity can reveal a surface pattern under suitable scan conditions. Thermal images identify temperature patterns; they do not confirm moisture or prove a defect.
| Specification | Residential minimum | Stronger target | What it controls |
|---|---|---|---|
| Native detector array | 120 × 120 | 320 × 240 | Whether small features resolve. Upscaling adds no detector data |
| NETD (thermal sensitivity) | 100 mK (0.10 °C) | 70 mK or better, 40 to 50 mK for moisture work | Smallest surface-temperature difference separated from noise |
| Temperature accuracy | ±2 °C or ±2% of reading (FLIR E8 spec) | Same spec, for screening | Confidence in an absolute temperature reading |
| Emissivity setting | Adjustable | Adjustable plus reflected-temperature compensation | Temperature readings on metal, glass, and painted surfaces |
| Field of view and IFOV | Wide enough for a full wall section | Narrower view for detail at distance | Whether small features remain distinct |
Detector array
For residential building-envelope inspections, look for a native detector of at least 120 × 120. A 320 × 240 array preserves more spatial detail for reporting, while a smaller detector may miss or merge features (residential infrared inspection standard). The practical question is whether a cold or hot pattern can be located clearly enough to compare with framing, insulation, or possible air leakage. An enlarged image cannot restore details the sensor never recorded.
NETD and accuracy
NETD describes the smallest temperature difference a sensor can distinguish from its own noise. Lower is better, but it does not guarantee that a scan will reveal a building defect. Guidance for building imagers gives 100 mK (0.10 °C) as a useful minimum, with 70 mK or better helping reveal subtler patterns; 40 to 50 mK may be worth considering for moisture-related investigation when the cost difference from an 80 mK model is small (buying guidance for building imagers). A 45 mK rating indicates finer temperature-difference sensitivity than 80 mK, but scan conditions and surface emissivity still affect what appears. The practical limits of NETD and accuracy are explained in this guide to thermal camera sensitivity and accuracy.
The FLIR E8 specification, ±2 °C or ±2% of the reading, makes displayed temperatures useful for screening, not laboratory proof. Reflections and low-emissivity surfaces can further distort readings. Set emissivity when the camera allows it, and treat shiny metal or glass with particular caution.
Field of view
A wide field of view captures more of a wall or roof at once. A narrower view can show more detail at the same distance, while IFOV helps determine whether a small feature occupies enough pixels to remain distinct. If a model's optical specifications are unavailable, regard its performance at distance as unverified rather than estimating it.
A thermal camera measures infrared radiation and converts it into a surface-temperature image, as described in what a thermal imaging camera actually measures. Confirm each model's native array, NETD, accuracy, emissivity controls, and field of view. Use the image to screen for patterns, then check suspected moisture with a moisture meter and suitable inspection methods. Skip claims based only on an upscaled megapixel count.
Side-by-Side Comparison of Four Popular Models
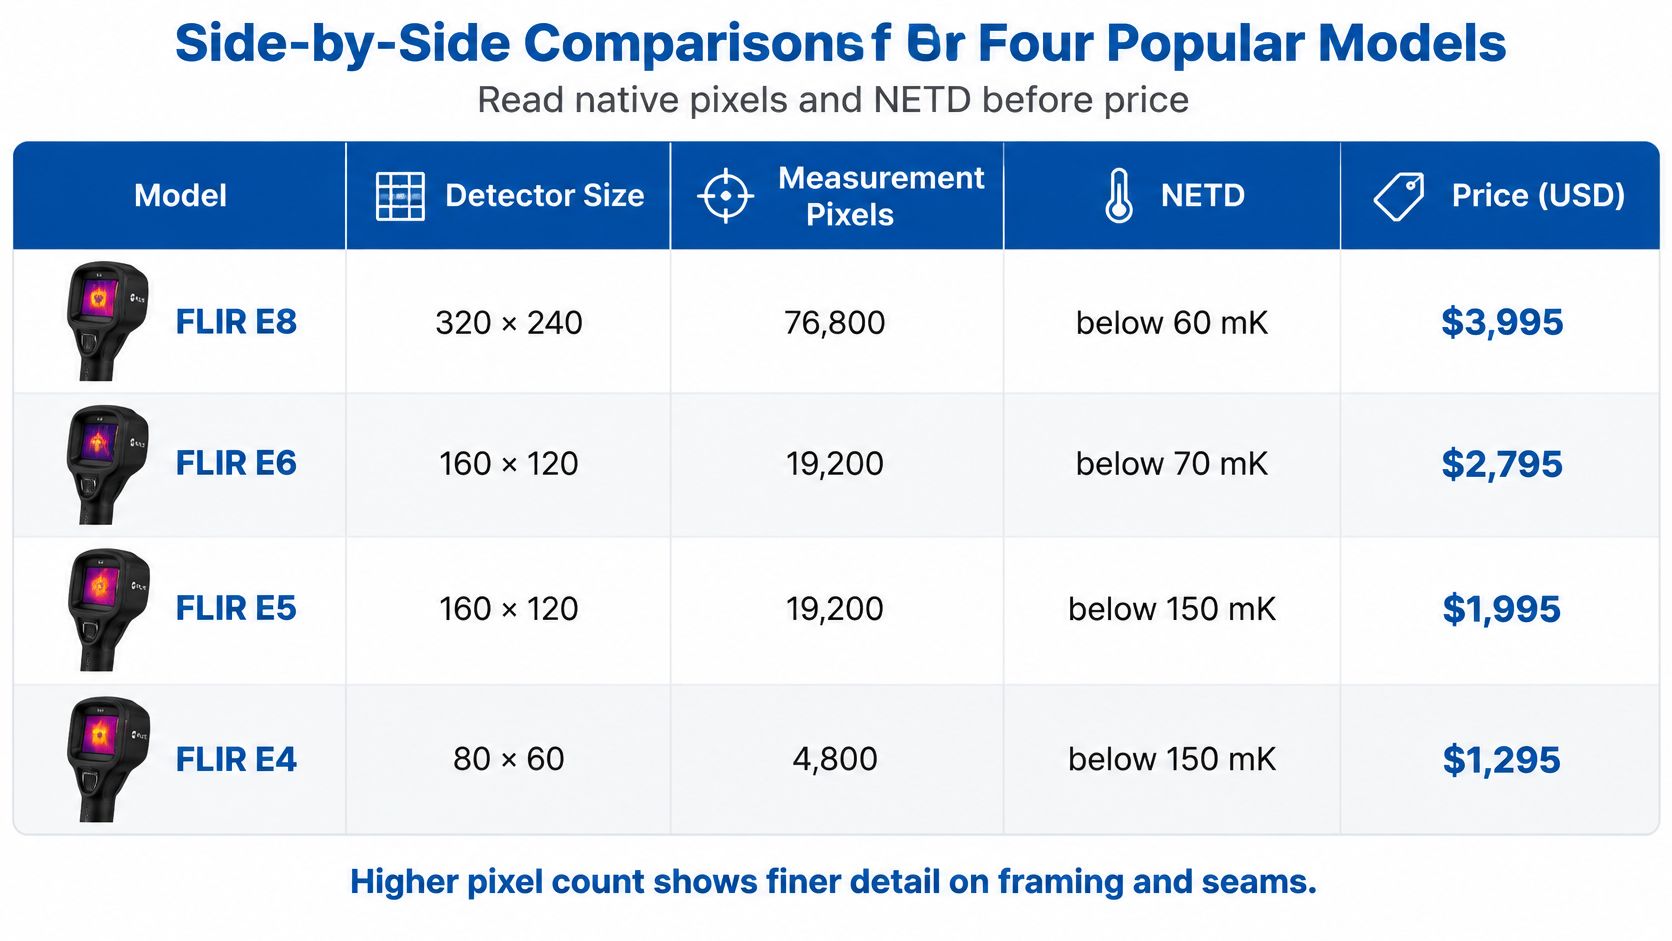
Model choice depends on more than the resolution headline. Native detector size and measurement controls shape how useful a scan is, while missing specifications should count against a purchase decision, not as neutral results.
| Model | Native detector | NETD | Accuracy |
|---|---|---|---|
| FLIR E8 | 320 × 240, 76,800 pixels | See manufacturer specifications | ±2 °C or ±2% of reading |
| Testo 868 | 160 × 120, 19,200 points; SuperResolution to 320 × 240 | Below 80 mK | Not confirmed here |
| Thermal Master Thor002 | Not confirmed here | Not confirmed here | Not confirmed here |
| MILESEEY TR10 | Not confirmed here | Not confirmed here | Not confirmed here |
The FLIR E8 specifications, with the Testo comparison in the same benchmark list the E8's 320 × 240 detector, 76,800 measurement pixels, and stated accuracy of ±2 °C or ±2% under specified conditions. The comparison also identifies the Testo 868's native 160 × 120 detector, 19,200 measuring points, SuperResolution output up to 320 × 240, and NETD below 80 mK. The E8's NETD is not stated here because the available comparison does not establish a verified figure.
What the pixel gap changes
A native 320 × 240 detector records more spatial detail than a 160 × 120 detector enlarged in software. That can help distinguish narrow temperature patterns around window frames, pipes, panel edges, and insulation transitions, particularly when working farther from a surface. SuperResolution creates a larger output image, but it cannot recover details the detector did not capture.
The Thor002 and TR10 rows remain incomplete because their detector, NETD, and accuracy specifications are not confirmed here. The section's comparison image identifies all four models, but it does not establish their prices or missing specifications. Check the manufacturers' current documentation before buying either camera, and treat an unverified NETD as an unknown rather than a sign of adequate sensitivity.
Which model fits which job
FLIR E8. Consider it for repeatable inspection records where its native detector can help separate a narrow pattern from surrounding surfaces. Confirm measurement settings and scan conditions before treating a displayed temperature as evidence.
Testo 868. Its documented strengths here are the 160 × 120 native detector and SuperResolution output. It may suit close-range screening when that native resolution meets the task. The enlarged image does not match the E8's native pixel count, and the listed NETD does not support choosing it for superior sensitivity.
Thermal Master Thor002. Consider it only after confirming the detector and NETD in current product documentation. Without those values, its suitability for fine building patterns cannot be judged from this comparison.
MILESEEY TR10. It may suit occasional DIY screening, but the specifications shown here do not establish its measurement performance or reporting suitability. Use a moisture meter to check suspected dampness, and scan under suitable conditions before drawing conclusions from a thermal image.
Smartphone Camera or Standalone Unit
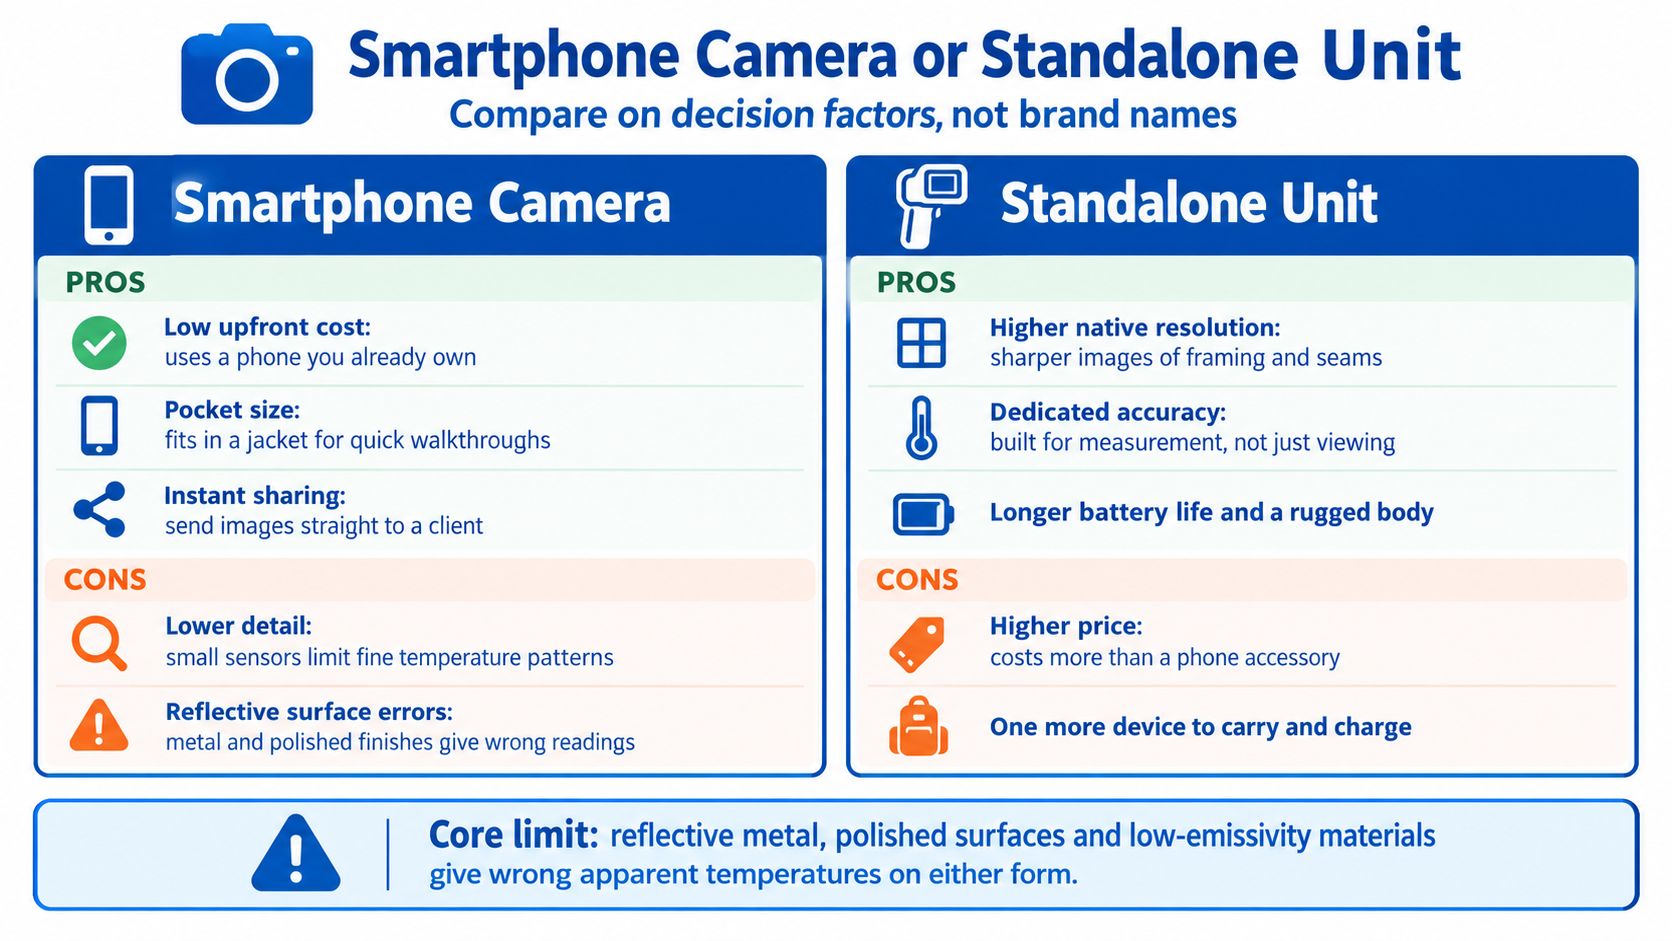
The practical difference between a phone attachment and a handheld is how well each supports a repeatable inspection. Check whether you can set emissivity, account for reflected temperature, and save images in a format you can use later.
Reflective metal and polished finishes can distort apparent temperature. Without adjustable emissivity and reflected-temperature compensation, a camera may show a precise-looking value that is unreliable. Basic phone attachments may not offer these controls. On an electrical panel, treat the image as a relative hot-spot screen, not proof of a specific temperature or danger (one inspector's account of measurement limits).
A thermal image shows where to look. The measurement settings determine how much to trust the number.
Ownership checks that spec sheets skip
Problems often show up on the second visit, when the app, cable, or file export gets in the way. Check the workflow before buying.
- Phone match: Confirm support for the exact Android or iOS phone you use.
- Connector: A loose plug can interrupt a crawlspace scan.
- Permissions and battery: Check what access the app requests. The phone battery also powers the camera.
- Offline use and export: Make sure you can save images without a signal and use them in your inspection report.
- Subscriptions: Check whether reporting features require a paid tier before comparing prices.
Two buyers, two tools
For a one-time walkthrough, a phone attachment can help identify patterns on drywall and painted surfaces, with images saved on the phone. For repeated inspections, panel documentation, or tracking a suspected leak over time, a standalone unit with manual emissivity, reflected-temperature settings, reporting tools, and a durable body is usually a better fit.
Either type needs care on glass and polished metal. If emissivity cannot be set, treat the displayed temperature as a clue rather than a measurement. Choose a phone-connected camera only if its app, connection, and file workflow suit your inspection needs. A thermal camera screens for patterns; confirm suspected moisture with a moisture meter.
Matching the Camera to Each Inspection Task
Choose a thermal camera for the surface and decision you need to inspect, not for its sensitivity number alone. Infrared shows temperature patterns, not moisture content. Moisture becomes visible only when it changes the surface temperature, and readings also depend on emissivity, camera settings, and scan conditions. A camera capable of detecting differences below 0.05 °C can still produce misleading patterns. Treat the image as a screening result, then verify it with a moisture meter or another suitable instrument (limits of infrared for building moisture).
| Inspection task | Minimum camera tier | Confirm with | Common false lead |
|---|---|---|---|
| Roof leak screening | 320 × 240 native, NETD under 70 mK | Moisture meter and attic visual check | Cool patch from shading or evaporation |
| Plumbing leaks inside walls | 320 × 240 native, NETD 40 to 50 mK | Moisture meter and visual inspection | Cool spot from air movement |
| Insulation gaps | 120 × 120 minimum, 320 × 240 preferred | Framing layout and air-sealing check | Thermal bridging that mimics missing insulation |
| HVAC duct and register checks | A unit that reads surface temperature | Contact thermometer reading | Reflections off nearby glass or metal |
| Electrical hot spots | Any unit with adjustable emissivity | Licensed electrician inspection | Displayed number on reflective metal |
A thermal pattern can guide the next check, but it cannot make the repair decision. The examples below show what to rule out before acting.
Read the pattern against the building
Roofs. A cool patch may come from shade or evaporation rather than a wet roof deck. Check the area with a moisture meter and inspect the attic before recommending a repair.
Plumbing. Air moving inside a wall can cool its surface, creating a pattern similar to evaporating water. Use the meter and visual inspection to decide whether further investigation is warranted, not the color palette alone.
Insulation. Studs create thermal bridges that can resemble missing insulation. Compare the image with the framing layout before recommending additional insulation or air sealing.
HVAC. A bright register may reflect nearby glass rather than show the supply-air temperature. Take a contact thermometer reading at the grille to check.
Electrical. A displayed temperature on a breaker or lug is only a relative comparison, especially on reflective metal. Set emissivity appropriately and have a licensed electrician assess any suspected fault. The camera readout is not a hazard rating.
For water-related inspections, follow a thermal imaging camera workflow for finding water leaks. The camera identifies a location to investigate. A moisture meter and other checks establish whether the pattern points to a problem.
Field Checklist for a Reliable Thermal Scan
A sharp-looking thermal image can still mislead if the building lacks enough temperature contrast. For envelope scans aimed at finding missing insulation or energy loss, an indoor-to-outdoor difference of at least 10 °C is preferred. A wider gap makes unusual patterns easier to distinguish; with a smaller gap, weak signatures may be missed (guideline on the temperature difference for envelope scans).
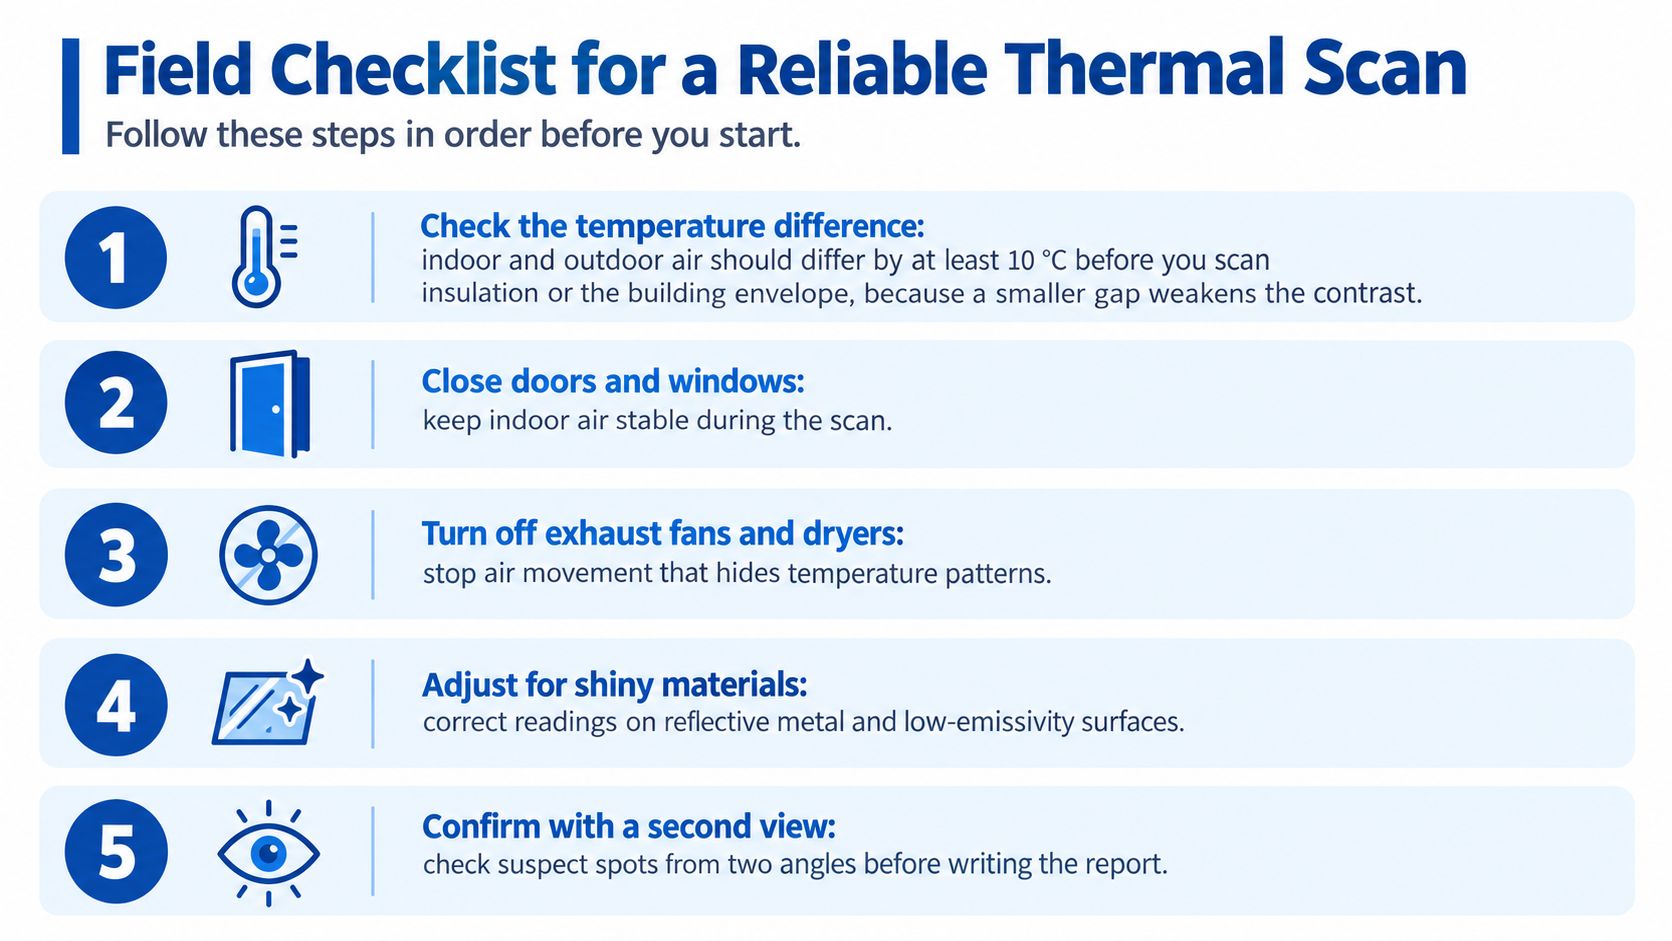
Run the scan in this order
- Check the temperature difference. Aim for at least 10 °C between indoors and outdoors before scanning insulation or the envelope. A smaller gap reduces contrast, making defects harder to spot.
- Set emissivity for the surface. Painted drywall has high emissivity, while polished metal is much lower. An incorrect setting skews the temperature reading, so adjust it when the surface material changes.
- Account for reflected temperature. Your body heat or a window reflecting the room can create an apparent hot spot. Check your position before interpreting it as a building feature.
- Keep distance and angle consistent. Scan roughly perpendicular to the surface. Both distance and angle affect how small details appear, so avoid moving closer only to areas that already look unusual.
- Pair each thermal frame with a visible-light photo. Without a clear location, a colored pattern is difficult to identify or document later.
- Record the conditions. Note indoor and outdoor temperatures, wind, and how long it has been since sunlight reached the wall. These details help another person repeat the scan under comparable conditions.
- Verify before assigning a cause. Use a moisture meter or visual inspection to check the pattern. Until confirmed, describe it as an anomaly, not a leak or insulation defect.
- Keep images and notes together. Export them in one report so the record includes both the thermal frames and the conditions in which they were captured.
For the camera setup and scan procedure, follow this guide to using a thermal imaging camera.
A reliable scan depends on consistent conditions and usable records. Label each anomaly as unconfirmed or confirmed, and document the settings and environment so the test can be repeated.
Confirm the Right Camera Before You Buy
Buy for the inspection you perform, not for the biggest resolution number on a spec sheet. A thermal camera screens for patterns; it does not confirm a leak or identify its cause.
You scan a home occasionally. The entry tier can reveal broad temperature patterns, but it may not resolve small defects or support reliable leak screening. For a one-off inspection, hiring a professional is another option. The AHIT guide to thermal inspection costs can help you compare that choice with buying a camera. A purchase makes more sense when you expect to scan repeatedly.
You inspect for clients or manage several rentals. Choose a professional-tier camera with a native 320 × 240 array, NETD under 60 mK, and manual emissivity control. Allow time to learn how surface properties and scan conditions affect readings. Better hardware cannot prevent false calls if you interpret every color patch as a defect.
You are checking a suspected leak yourself. Choose a camera that meets the stated leak-screening minimums: native 320 × 240 resolution and NETD of 40 to 50 mK for plumbing leaks, or under 70 mK for roof leaks. Verify those specifications before buying, since some mid-tier models have unconfirmed figures. Pair the camera with a moisture meter, and confirm the suspected area before making repairs.
Choose the model whose controls and measurement limits fit your work, then use a second tool to check what the thermal pattern suggests.
Compare the thermal imaging camera options with your inspection needs before choosing a model.
Common Questions About Thermal Home Inspections
Can a thermal image stand as proof in an insurance claim or a home sale? Not by itself. A thermal frame is qualitative evidence, so keep the scan conditions and a paired visible photo with it. Add a moisture reading or a licensed inspector's report to document what was confirmed. The image shows where to investigate, not what caused the temperature pattern.
Does thermal imaging work in summer? Yes, if the indoor-outdoor temperature difference is adequate, such as an air-conditioned interior during a hot afternoon. Keep the scan conditions consistent, including emissivity and distance. Warm weather alone does not create a useful temperature contrast.
Can a $199 camera scan a whole house? It can screen selected areas, such as attic hatches and exterior corners, but coverage and reporting limits make it a partial tool. Use it for electrical panel screening only if the camera has adjustable emissivity. Treat any panel finding as a relative hot spot for a licensed electrician to confirm, not as a diagnosis. Room-by-room documentation calls for higher native resolution and follow-up checks.
A thermal camera identifies patterns; a moisture meter helps test suspected moisture, and scan conditions affect what the image can show. DigiDevice is one option to check when comparing equipment. Confirm compatibility and specifications for the particular camera before buying. Choose a unit that fits the inspection task and supports the measurement workflow you can reliably use.