

Portable Projector for Camping: 2026 Setup Guide
A portable projector for camping works best when you stop treating it as an all-in-one gadget and start treating it as a small outdoor cinema system. Choose brightness for the campsite you will use, then plan power separately if you want a clear image and uninterrupted playback. Updated for March 2026.
The popular advice says to buy a battery-powered projector, pack a sheet, and press play after sunset. That setup can work for a short viewing session, but it often fails when you want a larger image, start before full darkness, or keep the projector on its brightest setting.
The Campsite Cinema Reality Check
The built-in battery sounds like the defining feature of a camping projector. In practice, it's often the feature that forces the biggest compromise.
Battery-powered models commonly run for about 2 to 3 hours at full brightness, while eco or low-brightness modes can extend playback to roughly 3.5 to 5 hours, according to recent portable projector testing. That difference changes the entire buying decision. A projector may last through a movie in eco mode, yet produce a noticeably weaker image while lanterns, campfires, moonlight, and leftover dusk compete with the screen.
A battery projector isn't useless. It's convenient for a quick film beside a tent, a children's movie after dark, or a compact setup where low weight matters more than image size. The problem starts when buyers assume the advertised runtime applies to the brightest, most useful mode.
Practical rule: Treat built-in battery life as a convenience feature, not as proof that the projector can power a bright outdoor theater all night.
The more dependable approach is modular. Use a projector with enough optical output for the conditions, then connect it to a suitable power bank or portable power station when the internal battery can't sustain the chosen brightness. That lets you preserve image quality instead of dropping into a dim mode halfway through the movie.
This is particularly important for group camping. A larger audience needs a more visible image, and a larger image spreads the available light across more surface area. A small pocket projector that looks acceptable on a modest tent wall may become disappointing when placed farther away and aimed at a wide screen.
The same principle applies to sound. A projector's internal speaker might be adequate for a quiet personal setup, but it won't always provide convincing dialogue or enough volume for a group without draining the projector faster. A separate speaker and power source make the kit more flexible.
For ideas on building a compact outdoor viewing arrangement, see this compact projector backyard movie night setup. The useful takeaway is simple: the best portable projector for camping is often a projector-plus-power-station combination, not the smallest device with the longest eco-mode claim.
Decoding Lumens for Outdoor Viewing
Brightness is the specification that determines whether an outdoor image looks watchable or washed out. Yet projector listings often make brightness difficult to compare, because a manufacturer's headline lumen figure may not represent the output you'll see in a practical picture mode.
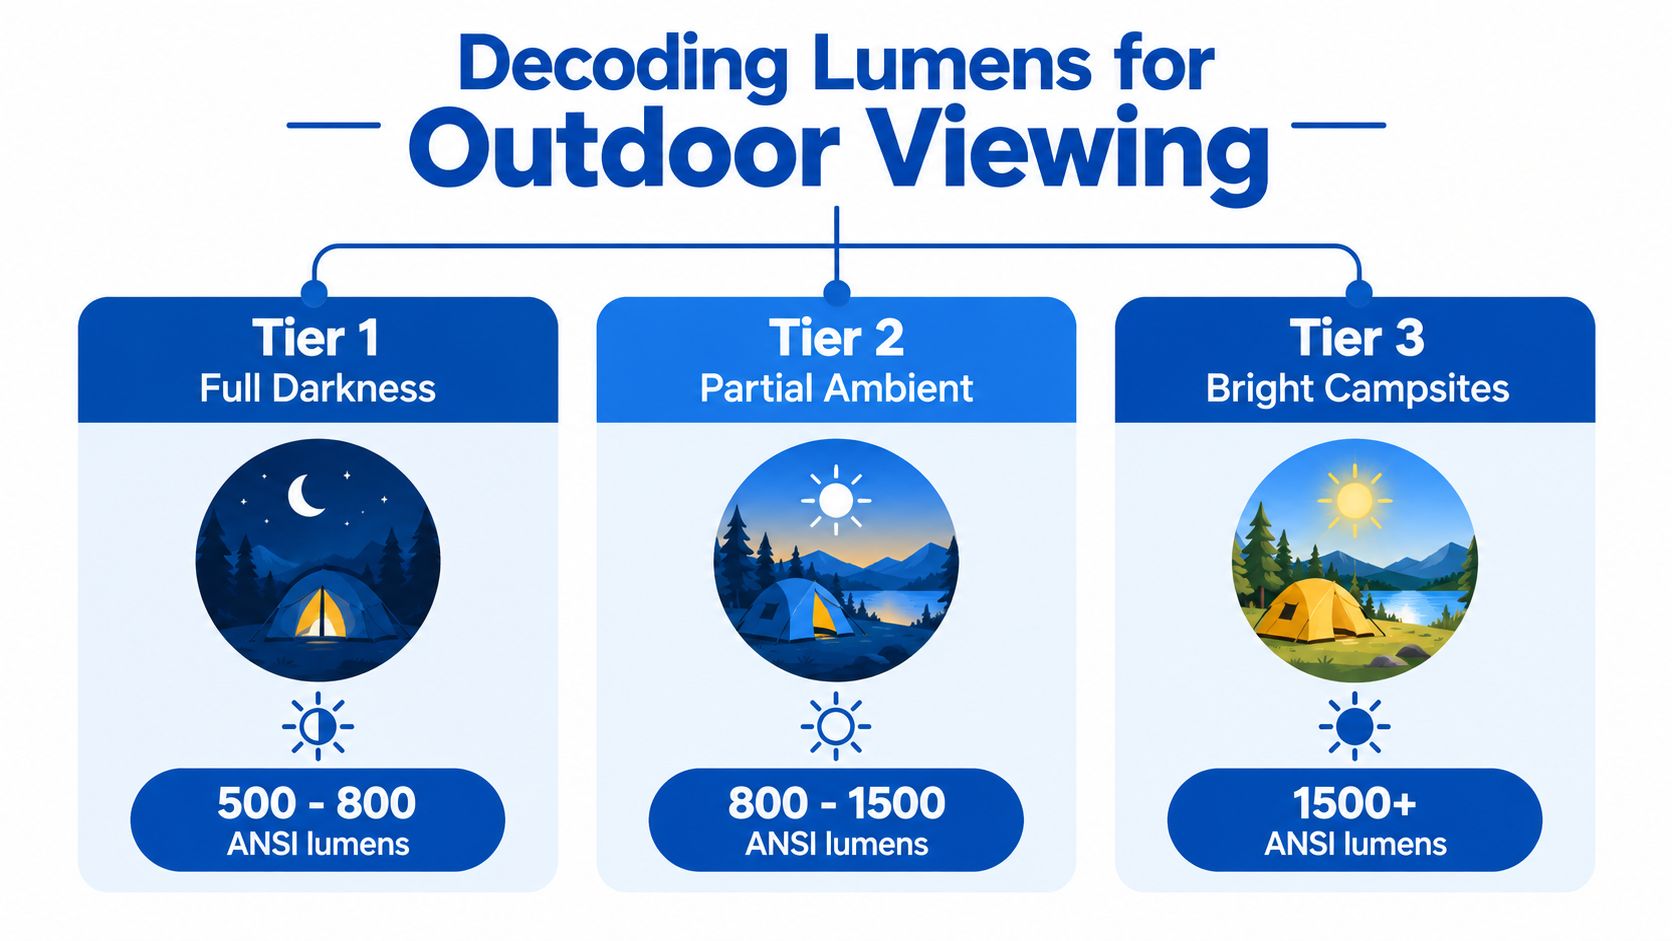
ANSI lumens are the more useful reference point for comparing portable projectors. A near-total-darkness campsite can tolerate less output, while a setup with lanterns, a fire, or a remaining sky glow needs considerably more headroom.
Independent guidance places the practical camping range around 500 ANSI lumens or more for basic night use, with 800 to 1,000 or more ANSI lumens providing a safer margin when the screen is larger or the scene isn't fully dark. Portable projector guidance from RTINGS also highlights how measured output can diverge from marketing claims. In one test, RTINGS measured only 276 lumens in movie mode on a 100-inch screen, so a listing alone shouldn't settle the purchase.
Match brightness to the light around you
Around 300 ANSI lumens may be suitable for near-total darkness, but it leaves little room for stray light. That can be enough for a small image on a dark campsite, provided everyone switches off nearby lamps and the projection starts after the sky has properly darkened.
At least 500 ANSI lumens is a more practical starting point for outdoor use. BenQ's outdoor projector guidance recommends at least 500 lumens for a good portable projector used externally. This level doesn't make a projector immune to ambient light, but it gives the image more presence in ordinary nighttime conditions.
For dusk, shade, or a larger screen, look toward 1,000 ANSI lumens or more. Forbes Vetted's outdoor projector guidance, as summarized in the verified testing data, places 350-plus lumens in the workable range after dark and 1,000-plus lumens where daylight or shade remains. Brightness is still only part of the result. Throw distance, screen material, image size, and nearby lights can alter perceived contrast.
Learn how to compare lumen brightness for daytime projector use before relying on a product title that just says “high brightness.”
Don't confuse a bright listing with a bright campsite image
A specification can describe the light engine under a particular mode, while your preferred settings may reduce output. Eco mode, movie mode, color calibration, and battery operation can all change what reaches the screen.
Use the product page to confirm that the manufacturer states ANSI lumens, not just an unattributed lumen figure. Then check independent measurements when they're available. If no measured result exists, choose a smaller image and wait for darker conditions rather than assuming the projector will overpower the campsite.
A white sheet can help, but it can't manufacture brightness. It may also introduce wrinkles and uneven reflections. A proper projection surface usually gives a cleaner result, especially when the group is sitting off-axis.
Solving the Battery and Runtime Tradeoff
Brightness and runtime are joined at the power budget. On a battery-powered projector, choosing a brighter mode generally means asking a small internal cell to deliver more energy per hour. That's why the most useful image and the longest stated runtime often belong to different settings.
Recent testing found that battery-powered portable projectors can provide about 2 hours at maximum brightness, while eco modes may stretch playback to roughly 4.5 to 5 hours. The Wirecutter outdoor projector testing makes the compromise clear, with about 2 hours at full brightness compared with approximately 4 hours 45 minutes in eco mode for the tested unit.
The following table turns that tradeoff into a campsite decision rather than a spec-sheet comparison.
| Brightness Mode | Estimated Runtime | Best Use Case |
|---|---|---|
| Full brightness | About 2 hours | Dusk, ambient light, larger image, or maximum picture punch |
| Eco or low brightness | Roughly 4.5 to 5 hours | Fully dark campsite, smaller image, longer viewing |
| External power | Depends on the projector and power source | Extended viewing without accepting the internal battery's brightness limit |
Choose the power strategy before the projector
Use the built-in battery when the priority is speed and simplicity. It suits a short personal session, a backpacking trip where every item must earn its place, or a late-night viewing plan that starts only after the campsite is dark.
Choose external power when you want to start earlier, use a larger screen, run brighter settings, or add stronger audio. A portable power station can also support equipment that isn't designed around a small internal battery. Confirm the projector's input requirements first, because USB-C power delivery, a DC input, and AC power from an inverter aren't interchangeable by default.
A vehicle-based setup benefits from planning beyond the projector itself. If your trips involve a campervan, the practical power considerations in this campervan solar setup for 2026 can help you think through charging, storage, and off-grid energy use.
When an all-in-one model still makes sense
An integrated battery reduces cables and makes placement easier. That matters when the projector sits beside a tent, where a separate power station would add clutter or weight.
It also gives you a predictable fallback. If the image is already clear in full darkness, eco mode may be perfectly acceptable. The mistake is buying the projector for its maximum brightness and then evaluating battery life using a lower-output mode without recognizing the difference.
For travel power options, compare the available power banks for travel with the projector's charging specification. The right solution isn't necessarily the biggest battery. It's the one that can provide the required input for the duration you need, without forcing the projector into a mode that undermines the image.
Physical Setup and Audio Solutions
A projector can have enough brightness and still deliver a poor campsite experience if it's pointed at a wrinkled surface from an unstable position. Outdoor cinema depends on geometry, not just electronics.
Start by choosing the screen location. Keep the audience facing away from direct lantern light, and avoid placing the screen where a campfire creates moving reflections. A flat, light-colored surface works for casual viewing, but a portable screen gives you better control over wrinkles, borders, and viewing angles. If you're organizing a larger gathering, this guide to finding a screen for your event is useful for comparing screen types and rental arrangements.
Build the image from the surface outward
Use the projector's throw guidance rather than placing it wherever a flat rock happens to be available. A tight tent site may require a short-throw arrangement, while an open field gives you more flexibility to move the projector back for a larger image.
A tripod mount or a stable platform helps keep the lens aligned. Uneven ground can create keystone correction demands, and aggressive digital correction may reduce the effective image area or soften the edges. Physical alignment is preferable when you can achieve it.
Follow this setup sequence:
- Secure the screen. Use stakes, guy lines, or weighted supports so wind doesn't turn the image into a moving target.
- Place the projector centrally. Aim for a position close to the screen's horizontal center rather than relying on extreme side projection.
- Set focus after the projector reaches operating temperature. Small changes in position or heat can affect sharpness.
- Reduce stray light. Turn lanterns away from the screen and place the brightest lights behind the audience.
- Test the entire signal chain. Start the video, connect audio, and confirm power before everyone settles in.
Give dialogue its own system
Built-in speakers keep the kit compact, but outdoor spaces absorb and scatter sound. Wind, conversation, and distance can make voices difficult to follow even when the projector's speaker is technically loud enough.
A compact Bluetooth speaker can create a more effective audio bubble near the audience. Watch for latency, especially with dialogue-heavy films or gaming content. If the projector and speaker support a wired connection, that can be a better option when synchronization matters more than cable-free placement.
The Tribit StormBox Micro 2 portable Bluetooth speaker is one example of a compact outdoor audio product listed for this type of setup. Keep the volume considerate. A good campsite theater should serve the group without turning into noise for every nearby pitch.
The Evolution of Portable Projection Tech
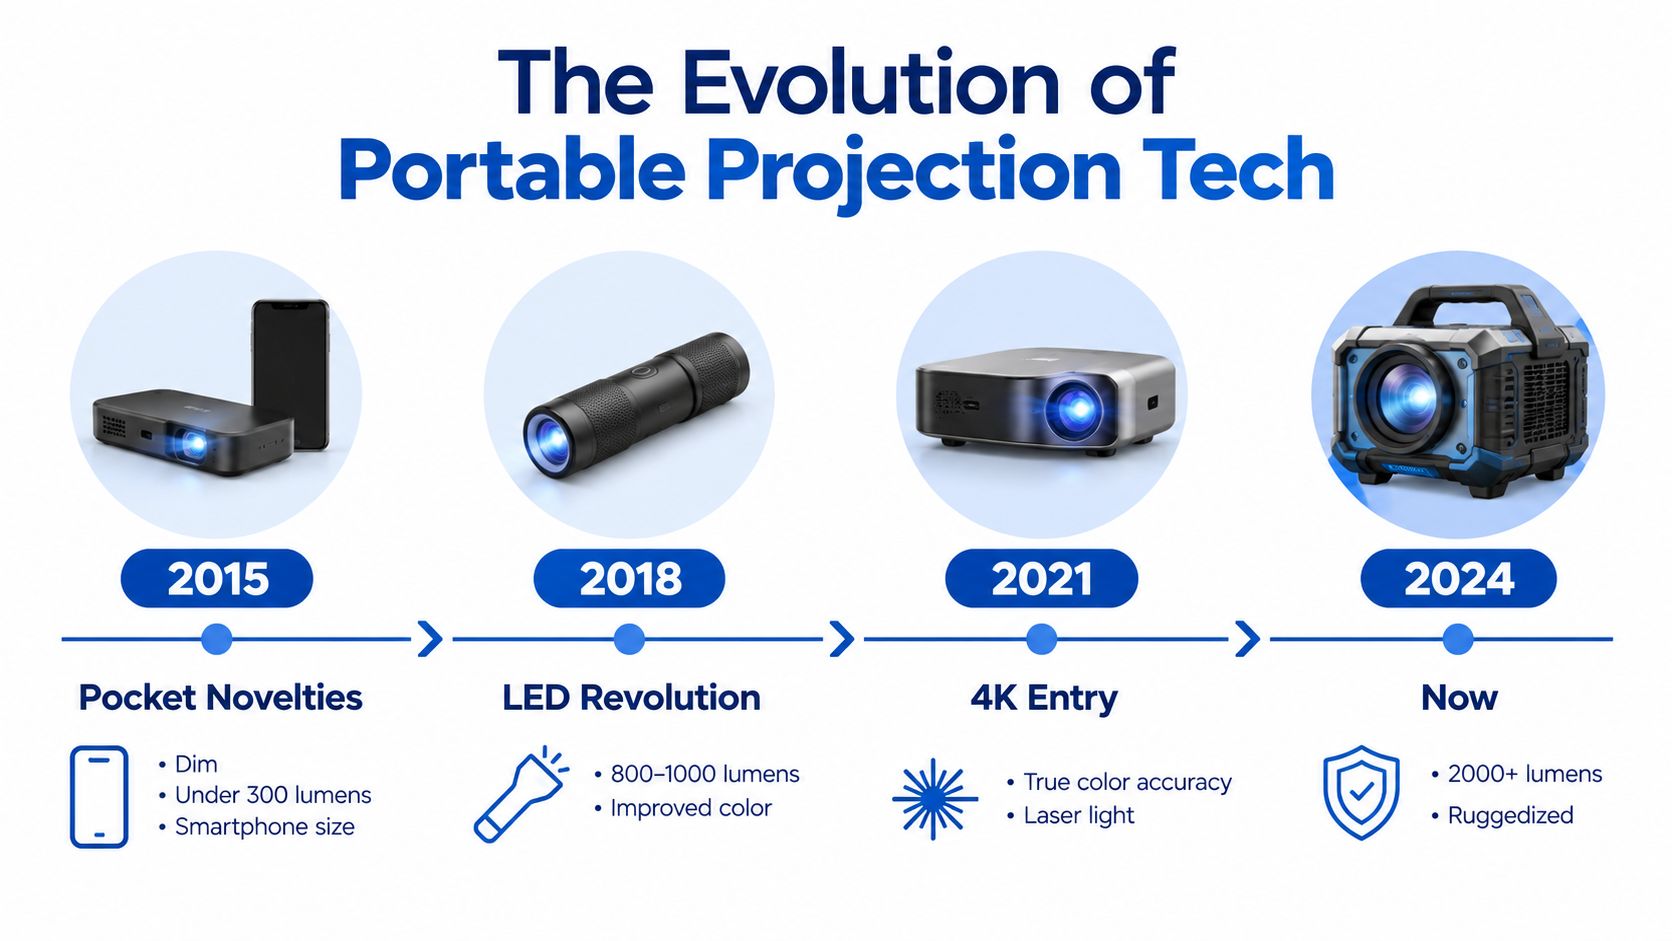
The portable projector category has moved beyond the very dim pocket gadget. Modern units commonly combine LED light sources, integrated batteries, compact bodies, and smart features, while higher-end models offer substantially more brightness and broader input support.
Industry reviews describe ordinary portable units clustering around 200 to 400 ANSI lumens, with premium portable models reaching roughly 700 to 2,400 ANSI lumens. The same category now includes compact projectors with 1080p resolution, and some higher-end models support 4K input. Those figures come from the portable projector market overview and product development context.
More capability usually means more equipment
A brighter light engine needs optics and cooling. A longer-lasting battery needs capacity. A projector that combines both may be far less pocketable than an older mini model, but it can produce a much more useful image away from a blackout room.
That's the central shift. Early compact projectors were easy to carry but often demanded near-total darkness and a modest image. Newer outdoor-oriented models are better suited to group viewing, yet their power demands make an external source more attractive.
Smart operating systems can also simplify the campsite kit. Built-in apps may reduce the need for a separate streaming stick, but they don't remove the need for connectivity. A projector can have a modern interface and still be impractical in a remote location if the content hasn't been prepared in advance.
What to inspect in a 2026 purchase
Look for a clearly stated ANSI lumen figure, a resolution that matches your viewing expectations, and a power input that fits your travel system. A projector with 4K input support may accept a high-resolution source without displaying a native 4K image, so read the specification carefully rather than treating “4K” as a complete picture-quality description.
Check whether the unit supports offline playback, USB media, HDMI, or phone casting. These features matter more at a campsite than a long list of smart functions that depend on a reliable internet connection.
The market is growing from a measurable base. One estimate valued the global portable projector market at USD 1.81 billion in 2025 and projected USD 2.68 billion by 2034, with a projected 4.48% CAGR, while another study estimated USD 1.9 billion in 2024 and projected a 4.5% CAGR through 2031. These are market projections, not guarantees for any individual product or brand.
Durability and Campsite Connectivity
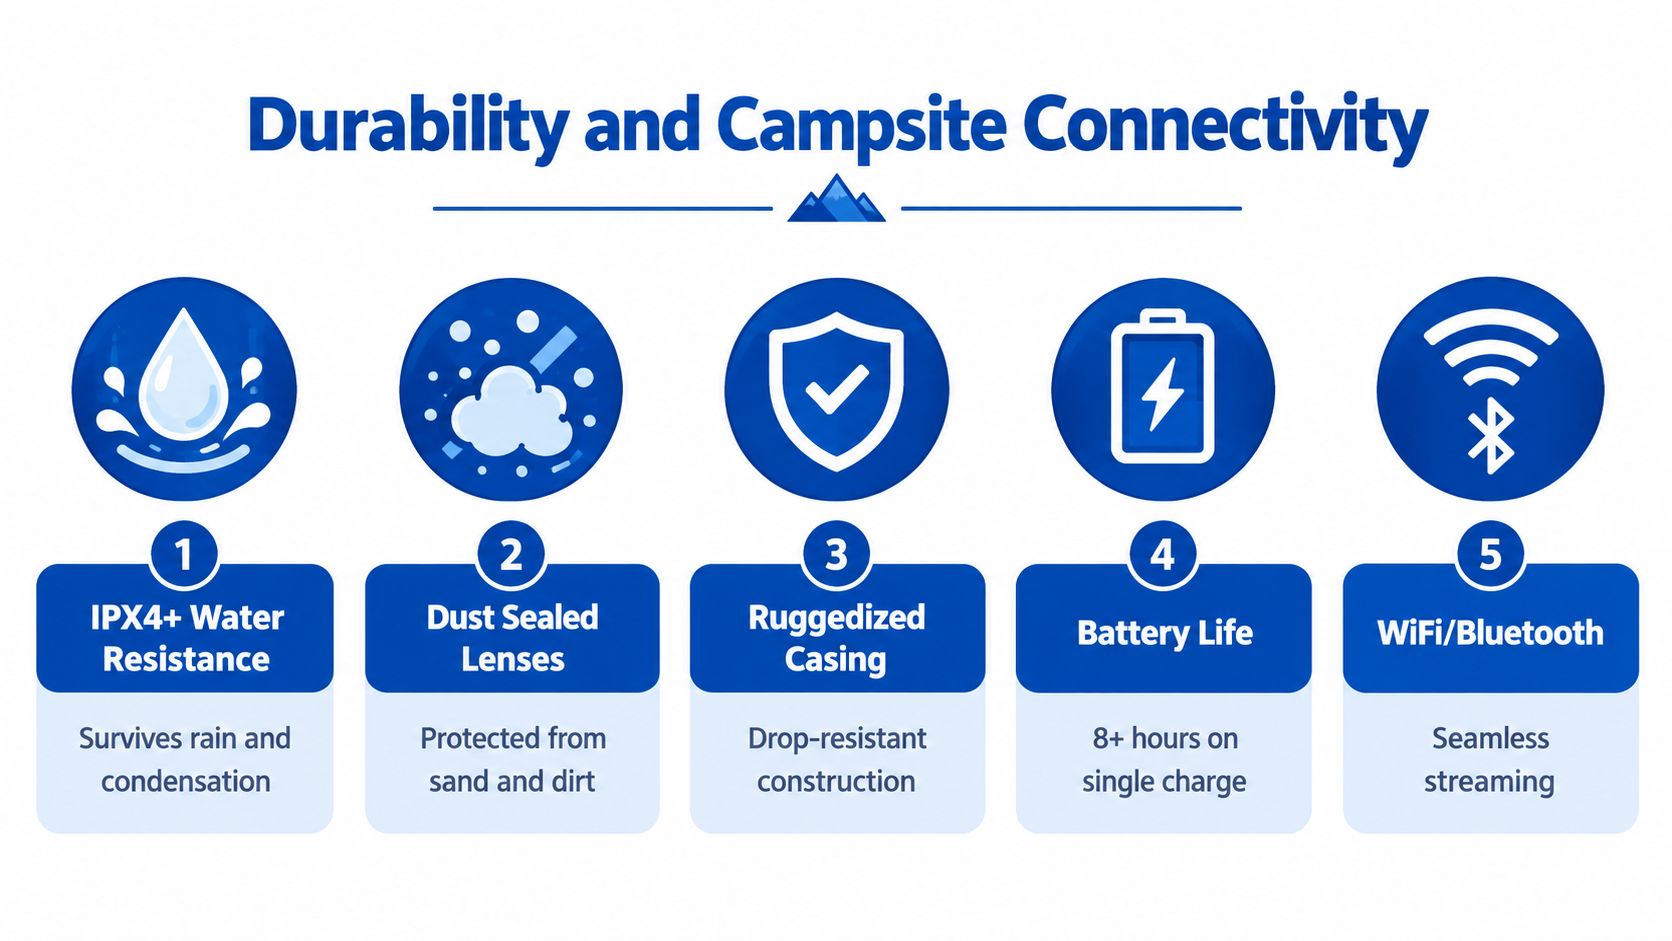
Camping exposes electronics to dust, damp air, uneven surfaces, and hurried packing. A projector that performs well indoors may become troublesome outdoors if its ports, lens, and cooling path aren't protected.
Start with the physical enclosure. Look for a ruggedized body, a protected lens, accessible but coverable ports, and a design that can sit securely on a tripod or stable platform. A splash-resistant specification can help with incidental moisture, but it doesn't make the projector suitable for rain. The safest practice is still to stop viewing when weather turns wet and pack the unit only after condensation has been managed.
Prepare content before leaving signal range
Streaming at camp can fail for reasons unrelated to the projector. Mobile coverage may be weak, a campsite network may be congested, or the service you expect to use may not support the playback method you planned.
Download permitted content before the trip and test it in airplane mode. Carry a compatible USB drive or HDMI source when the projector supports those inputs. This makes the setup less dependent on Wi-Fi and reduces the temptation to use a phone hotspot until its battery is empty.
A practical connectivity checklist includes:
- Offline playback: Confirm the downloaded file opens on the actual projector or source device.
- Cable compatibility: Pack the correct HDMI, USB, or charging cable instead of assuming every USB-C port has the same function.
- Bluetooth pairing: Connect the speaker before the audience arrives and test for noticeable audio delay.
- Condensation control: Allow a cold projector to acclimate before powering it on in warmer, humid air.
- Lens protection: Use a cap or clean cover during transport, and remove dust with the recommended method rather than rubbing grit across the lens.
For phone-based viewing, this guide to connecting a phone to a projector can help you check the signal path before you reach the campsite. The most reliable outdoor setup is the one you can operate without searching for a forgotten adapter in the dark.
Real-World Scenarios and Troubleshooting
A campsite movie night usually changes character as the evening progresses. At dusk, the image needs more brightness and a smaller screen. Once the sky is dark, you can reduce the output, improve contrast, and preserve battery if the picture remains clear.
Start with a short test clip before launching the main film. Check focus at the center and corners, then look at subtitles or small text. If one edge is blurry, don't immediately blame the lens. The projector may be tilted, the screen may be uneven, or digital keystone correction may be compensating for an extreme angle.
Common problems and practical fixes
The picture looks washed out. Turn off nearby lamps, wait for darker conditions, reduce image size, or switch to a surface with better reflectivity. Increasing brightness may help, but it also increases power demand.
The projector runs hot near the fire. Move it away from direct heat and keep its ventilation openings clear. A campfire is a poor neighbor for any projector because radiant heat and smoke can affect both cooling and the lens.
Bluetooth audio trails behind the video. Re-pair the speaker, check whether the projector offers an audio-delay adjustment, and use a wired output when synchronization is critical. Keep the speaker closer to the audience than to the fire or the screen if you want clear dialogue at a moderate volume.
The image shakes in the wind. Stabilize the screen first. A rigid projector on a tripod can't compensate for a fabric surface that is moving continuously.
The battery warning appears early. Lower the image size or brightness only if the resulting picture remains readable. Otherwise, connect the planned external power source. This is exactly why the power strategy should be part of the purchase rather than an afterthought.
A modular kit is easier to improve over time. You can replace the screen without replacing the projector, add a better speaker, or use a larger power station for vehicle-based trips. For a lightweight personal setup, the internal battery may be enough. For a group theater with a bright image and dependable sound, separate power remains the more practical route.
People Also Ask
Can a portable projector work at a campsite before full darkness?
Yes, but ambient light reduces contrast and can make the image look faded. Use a smaller image, control lantern placement, and choose a projector with more brightness headroom if you want to start during dusk or in a partially lit area.
Is a built-in battery enough for a camping movie?
It can be enough for a single viewing session when you use a suitable brightness mode and begin in darkness. If you want maximum brightness, longer playback, or separate audio, plan for a compatible external power source instead of relying only on the internal battery.
What matters more, brightness or portability?
That depends on the campsite. Portability matters for backpacking and short personal sessions, while brightness matters more for larger screens, group viewing, and early-evening use. A balanced setup pairs a manageable projector with a power plan that lets you use its useful brightness.
DigiDevice offers compact projectors, portable audio, mobile accessories, and power-focused electronics that can fit into a modular campsite cinema kit. Visit DigiDevice to compare the available gear and build a portable projector setup around your actual screen, sound, and power needs.