

Monitor Arm Setup for Better Posture and Desk Space
A reliable monitor arm setup starts with the desk, not the product page. Measure the desk edge, rear clearance, mounting surface, monitor weight, and VESA pattern before choosing between a clamp and a grommet. Once installed, position the screen at a comfortable height and distance, then route cables with enough freedom for the arm to move without pulling connections.
Updated for March 2026. You may be trying to reclaim a crowded desk while your monitor sits too far back, your neck creeps forward, and paperwork keeps getting pushed aside just to see the screen edge. That arrangement can feel normal after a few days, but the repeated micro-adjustments are usually a sign that the monitor arm setup is wrong, not that you need a more expensive chair.
Why Your Monitor Arm Setup Matters More Than You Think
A monitor arm can either make a desk feel open and adjustable or add another source of wobble, glare, cable drag, and neck tension. The difference rarely comes from the arm's appearance. It comes from whether the mount fits the desk, whether the spring is balanced for the installed load, and whether the final screen position suits the person using it.
The ergonomic case is stronger than simple desk-space marketing. In a 335-person office-worker study cited by Kensington, monitor-arm users showed less neck flexion, neck protraction, and trunk flexion than users of alternative setups. The same source reports that 99.1% of monitor-arm users were satisfied with their setup, with 85.8% rating satisfaction as 3 or 4 on a 4-point scale. Kensington's monitor-arm white paper connects the accessory with measurable posture and comfort differences.
Practical rule: A monitor arm isn't ergonomic because it has a gas spring. It becomes ergonomic only after the desk, monitor, mount, and user position work together.
The hardware has evolved with display technology. Designers Peter Bosson and Brenda Saunders, working through Colebrook Bosson Saunders with Olivetti, anticipated adjustable workstation ergonomics in the mid-1980s. By 1999, they had invented the first flat-screen monitor arm, as described in the Herman Miller design story.
That history explains why modern arms are more than desk-space accessories. Flat panels made eye-level positioning and arm's-length viewing practical for ordinary workstations. Still, spec sheets rarely reveal which desk edges will crush, which clamps will sit crooked, or which cable channels will fight the arm after installation.
The three decisions that matter most are simple:
- Desk fit: Can the base physically attach without an obstruction?
- Mount type: Does a clamp or grommet transfer the load safely?
- Post-install positioning: Can you place the screen comfortably without maxing out the arm's reach?
For advice on reducing visual discomfort alongside a better mount, see this guide to choosing monitors for eye strain.
Measure First, Buy Second
Most failed installations begin with a purchase made before anyone looks behind the desk. Measure the workstation, including the parts hidden by a desk pad, cable tray, wall, privacy panel, or standing-desk frame.
The pre-purchase checks that prevent returns
- Confirm the VESA pattern. Measure the threaded holes on the rear of the display from center to center in both directions. Common patterns include 75x75 mm and 100x100 mm, but the monitor manual remains the authority.
- Weigh the installed display. Include the VESA plate, webcam, USB hub, light bar, and any other accessory attached to the arm. BenQ's monitor-arm buying guidance recommends adding 2 to 3 kg of buffer and leaving 1 to 2 kg of headroom on either side of the usable range.
- Measure the desk edge. Check the thickness where the clamp will sit, not the thickness at the center of the desktop. A clamp may specify a range such as 20 to 60 mm, while the lower jaw still needs a flat, unobstructed contact area.
- Inspect the rear clearance. A clamp needs room for its body and lower jaw. If the desk is flush against a wall or a cable tray blocks the underside, the clamp may be unusable even when the desk thickness is within specification.
- Check the mounting hole option. Grommet systems may require a hole in the 8.5 to 70 mm range, depending on the arm. Confirm the hole size and inspect the underside before drilling.
- Account for large displays. A heavy curved or ultrawide screen needs more than a nominal weight match. Universal arms are commonly offered in the 13 to 15 kg capacity band, while recent premium arms increasingly support 20 to 35 lb displays and wider VESA coverage, including 200x100 mm, according to recent monitor-arm coverage from Monitoraholic.
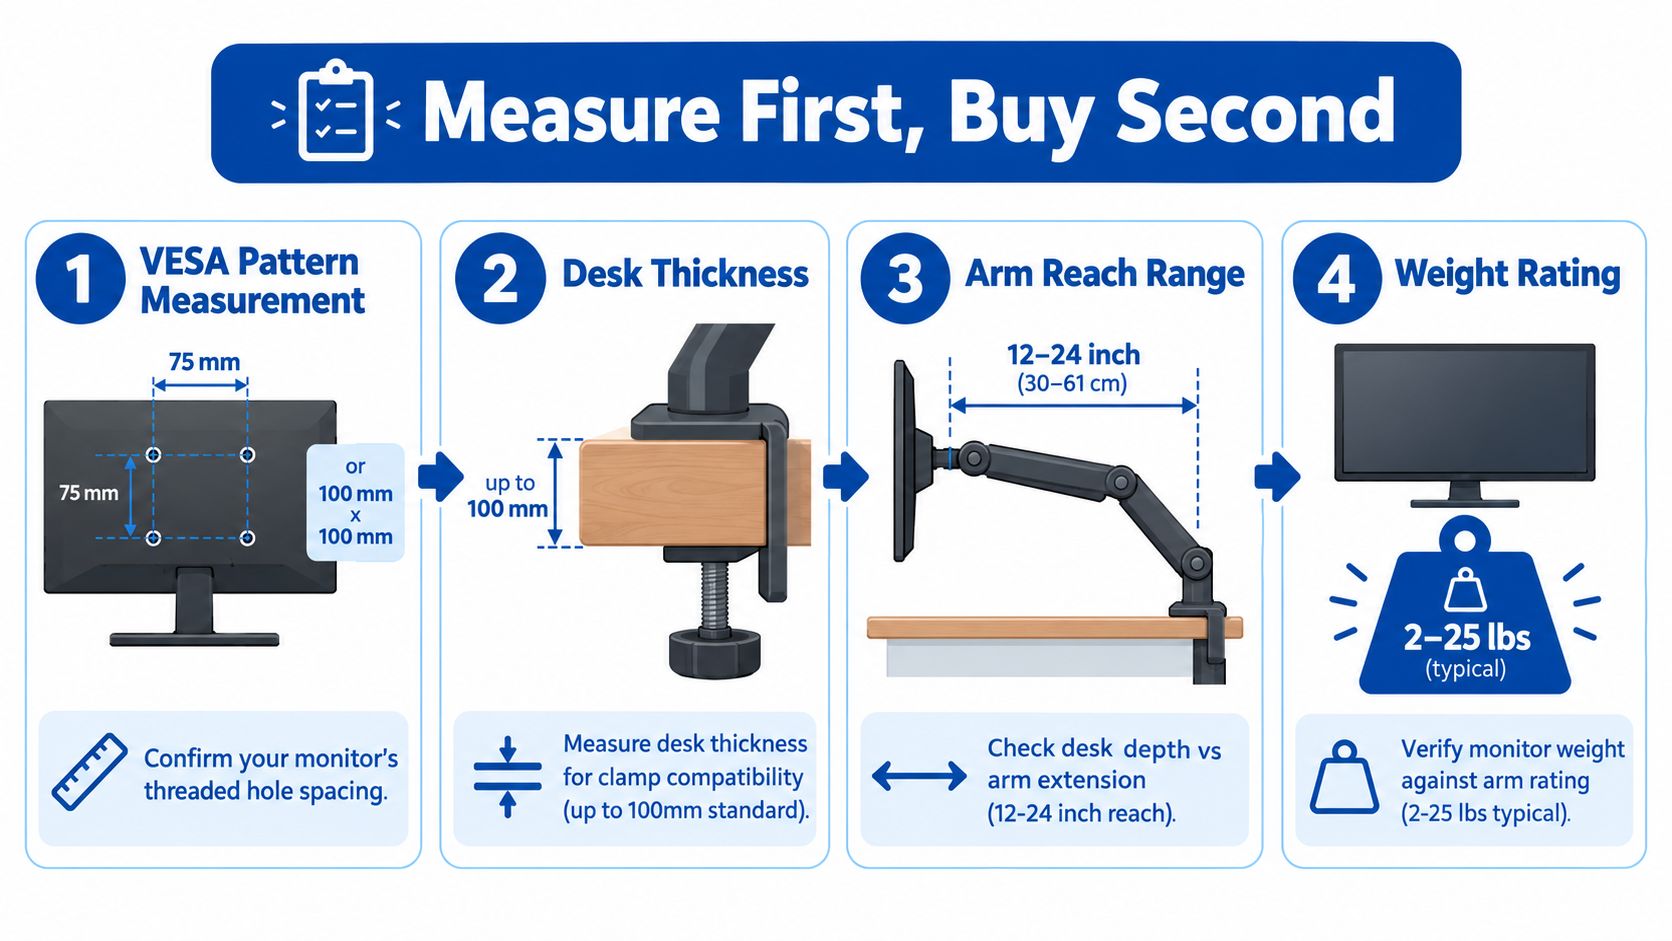
The hidden measurement is stand-off depth, the distance between the desk's rear edge and the wall. Gas-spring arms need room to pivot, and a short desk placed hard against a wall can eliminate much of the advertised reach.
If your desk is compact, compare the arm's footprint with broader guidance on home office furniture for small spaces. The furniture layout can determine whether an arm has enough travel before the monitor collides with a wall or shelving.
For a small-room workstation, this guide to ergonomic gaming desks for small rooms can help you assess the desk as a complete system. If two measurements are borderline, choose the heavier-duty arm or change the mounting method rather than hoping the adjustment screws will compensate.
Clamp vs Grommet Which Mount Actually Fits Your Desk
A clamp is convenient because it doesn't require drilling. It works best against a straight, flat edge with clear access underneath. The failure usually happens when a beveled edge, rounded lip, modesty panel, steel rail, or cable tray prevents the lower jaw from sitting squarely.
A grommet mount transfers force through the desktop with a bolt and backing hardware. It requires an existing cable hole or a willingness to drill, but it can provide a cleaner anchor for a heavy display when the desk edge is unsuitable. The key is not that one mount is universally stronger. The key is whether the desk can support the load in the first place.
| Desk condition | Clamp fit | Grommet fit |
|---|---|---|
| Straight, solid edge with open underside | Usually suitable | Suitable if a hole is available |
| Rounded or beveled edge | Often unstable | Usually preferable |
| Wall-flush desk with no rear access | Usually unsuitable | Suitable if drilling is safe |
| Cable tray or crossbar below the edge | May be blocked | Often easier to position |
| Glass desktop | Avoid concentrated clamp pressure | Use only with an appropriate rated system |
| Heavy ultrawide display | Works only with a properly rated base | Often offers better load transfer |
A practical example is a 25 mm IKEA tabletop with a 10 mm chamfered edge. The thickness may appear compatible, but the chamfer can stop a clamp from gripping flat. A grommet mount may work if the desktop construction and underside access support it.
Standing desks add another complication. A clamp can interfere with a rear crossbar or collide with the lifting frame. A through-desk bolt, or a compact C-clamp designed for the frame geometry, may solve the problem without placing the arm directly over a moving obstruction.
A clamp that touches the desk in only two narrow places isn't “almost fitted.” It's waiting to slip.
Before adding other desk hardware, consider whether a phone mount for desk can keep a secondary device away from the monitor arm's travel path. Small accessories still need to respect the arm's rotation and cable movement.
Getting the Arm Out of the Box and Onto Your Desk
Start by laying every component on a clear surface and grouping parts by assembly stage. Separate the base, clamp or grommet hardware, arm segments, VESA plate, screws, washers, and cable covers. This prevents the common mistake of using a visually similar screw in a recessed VESA hole.
Check the VESA plate orientation against the monitor before attaching it. The plate may have a top arrow, a cable cutout, or an offset that must align with the display. Use the diagonal screw pattern first so the plate sits evenly, then tighten the remaining screws without forcing them into a recessed mount.
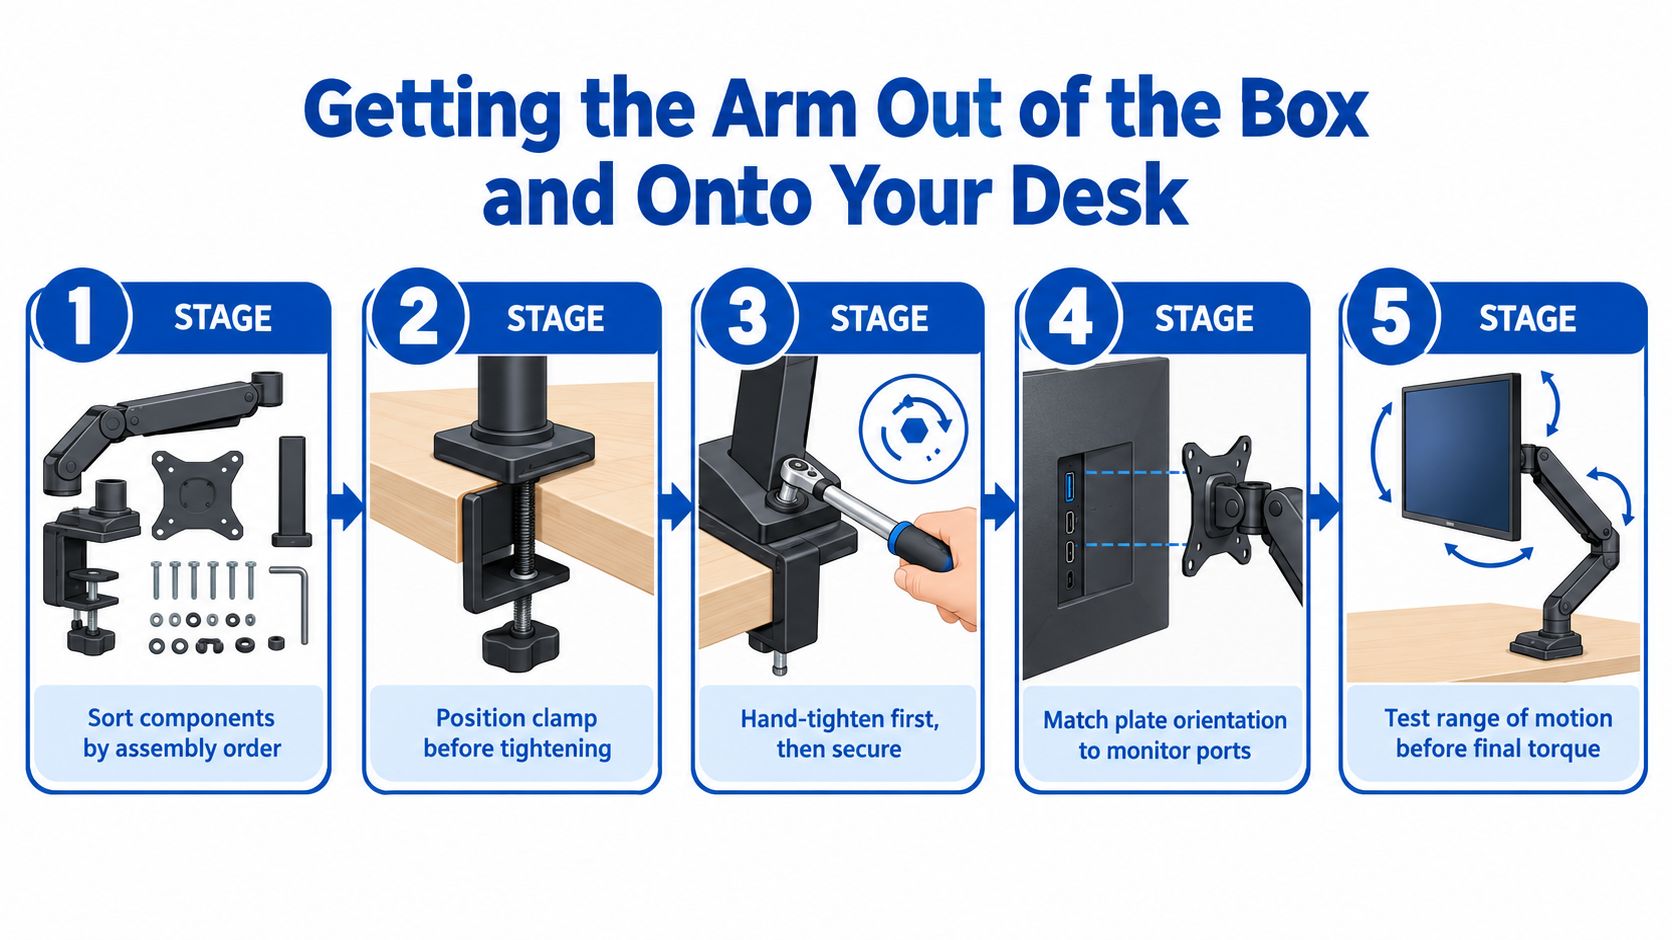
Build the base before lifting the arm onto the desk. For a clamp, clear the desk pad, slide the upper and lower jaws into position, and hand-tighten the lower bolt until the pad seats. Then tighten the upper hardware evenly. Excessive force can crush particleboard or deform a thin edge without making the mount safer.
For a grommet, confirm that the hole diameter matches the sleeve and that the through-bolt clears cable channels underneath. The backing plate should sit flat. If it rocks on a desk frame or channel, stop and resolve that contact before attaching the monitor.
Mount the arm with the tension controls near their factory midpoint. That leaves adjustment room in both directions after the display is attached. Lift the monitor onto the VESA interface with a second person if the screen is large or awkward, then secure the locking screw or safety tab.
A gentle range-of-motion sweep comes next. Move the empty arm through its intended arc, then move the display slowly while watching the base, joints, and desk edge. Connect cables only after the monitor holds position and the base stays still.
For furniture-specific safety checks, a homeowner's assembly guide offers useful context on checking surfaces, hardware, and load-bearing connections. A video can also clarify the order of the physical work:
A stable monitor arm also improves the rest of the workstation. These gaming desk setup ideas are useful when the display, keyboard, speakers, and mouse need to share a limited surface.
Dialing In the Ergonomic Position
The best position is the one that lets your head stay balanced over your torso while your eyes meet the useful part of the screen. Start with the chair at its normal working height, feet supported, shoulders relaxed, and hands resting where you usually type.
The top of the display should sit approximately level with your eyes, or slightly below them, rather than forcing your chin upward. A monitor that's too low encourages forward head posture, while one that's too high can make the upper neck work continuously.
Three adjustments that interact
- Height: Raise or lower the arm until the screen's upper area is comfortable without lifting the chin.
- Reach: Bring the display close enough that you don't lean forward to read, but not so close that you constantly refocus at an uncomfortable distance. An outstretched arm is a useful personal starting reference.
- Tilt: A modest backward tilt can reduce reflections and accommodate the natural downward direction of the gaze during focused work.
| Target | Range | Why it matters | How to measure |
|---|---|---|---|
| Eye level | Approximately level or slightly below | Reduces repeated chin lifting and forward neck movement | Sit in your usual chair and compare your eye line with the upper screen area |
| Viewing distance | Comfortable arm's-length starting point | Helps you read without leaning or crowding the display | Extend your arm and adjust based on text size and comfort |
| Screen tilt | Slightly backward rather than perfectly vertical | Helps manage glare and supports a natural downward gaze | Adjust while viewing normal work, not a blank desktop |
| Screen center | Aligned with your primary task | Limits repeated head rotation | Place the main application where your eyes naturally settle |
A height change affects reach, and a tilt change affects how the screen's weight pulls against the arm. Make one adjustment at a time, then check the whole position again. If the monitor slowly drops after you tilt it, the issue may be tension balance rather than posture.
For additional workspace habits, compare this workplace wellness guidance from KODOBI. It's useful to treat the arm as one part of the workstation instead of expecting it to correct a chair, desk, lighting, or keyboard problem by itself.
Cable Management That Moves With the Arm
Cable routing fails when it treats an articulating arm like a fixed stand. The display may look tidy at rest, but the first rotation pulls a DisplayPort connector, tugs a USB lead, or yanks the power cable against the joint.
Choose cables that bend naturally without being excessively stiff or ultra-thin. Heavy power cables can add drag, while fragile thin leads may not tolerate repeated movement. Run power and signal cables together through the arm's channel where possible, keeping their bend path consistent.
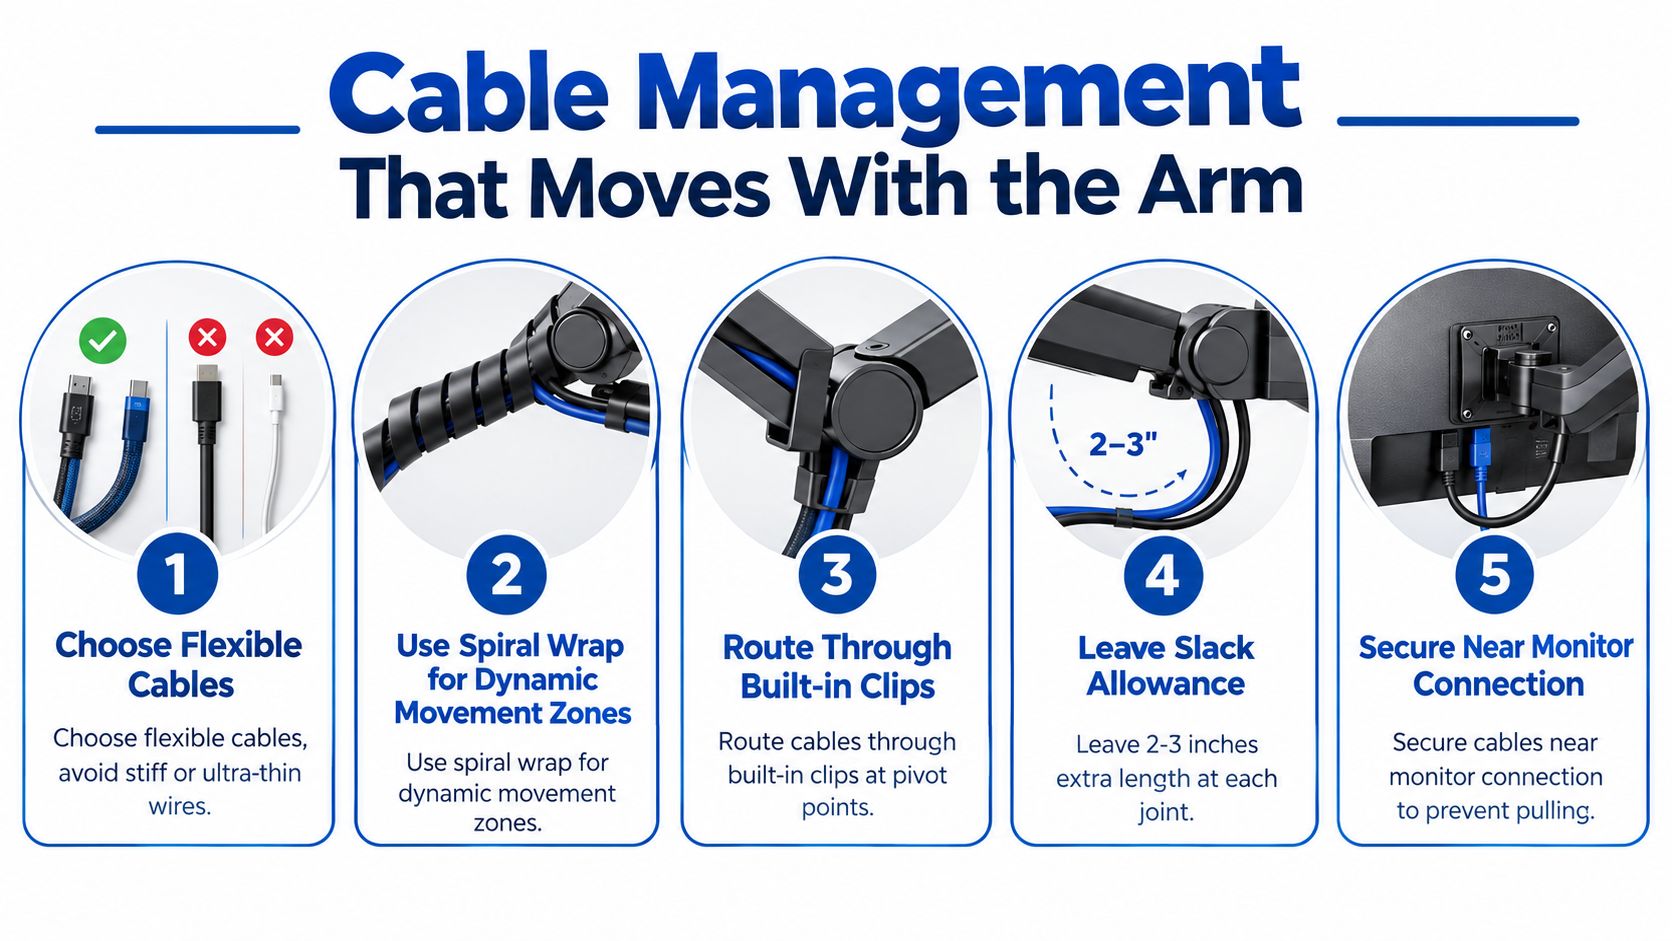
Use the built-in clips at the pivot points, or add spiral wrap where the arm has no channel. Leave a small service loop at every moving joint. The loop should allow the arm to extend without pulling the connector, but it shouldn't be so large that it catches on the desk or chair.
Route from the monitor outward
Attach the display-end cables first and move the arm through its full practical arc. Watch the connector while the screen moves forward, back, up, down, and into portrait orientation if supported. Then decide where the cable bundle exits the desk.
Keep the exit point behind the desk rather than beside the clamp's adjustment hardware. On a sit-stand desk, leave enough loose cable for the full height range and secure it beneath the surface with soft clips instead of rigidly pinning it to the frame.
Cable test: If the monitor moves smoothly but the cable bundle becomes taut at any point, the installation isn't finished.
USB hubs and DisplayPort cables deserve particular attention because a partial connection can look like a graphics or dock fault. After routing, wake the monitor repeatedly, reconnect the hub, and test the display at its intended refresh and resolution. A cable organizer clips guide can help keep the desk-end bundle controlled without restricting the arm.
When the Arm Does Not Behave Troubleshooting
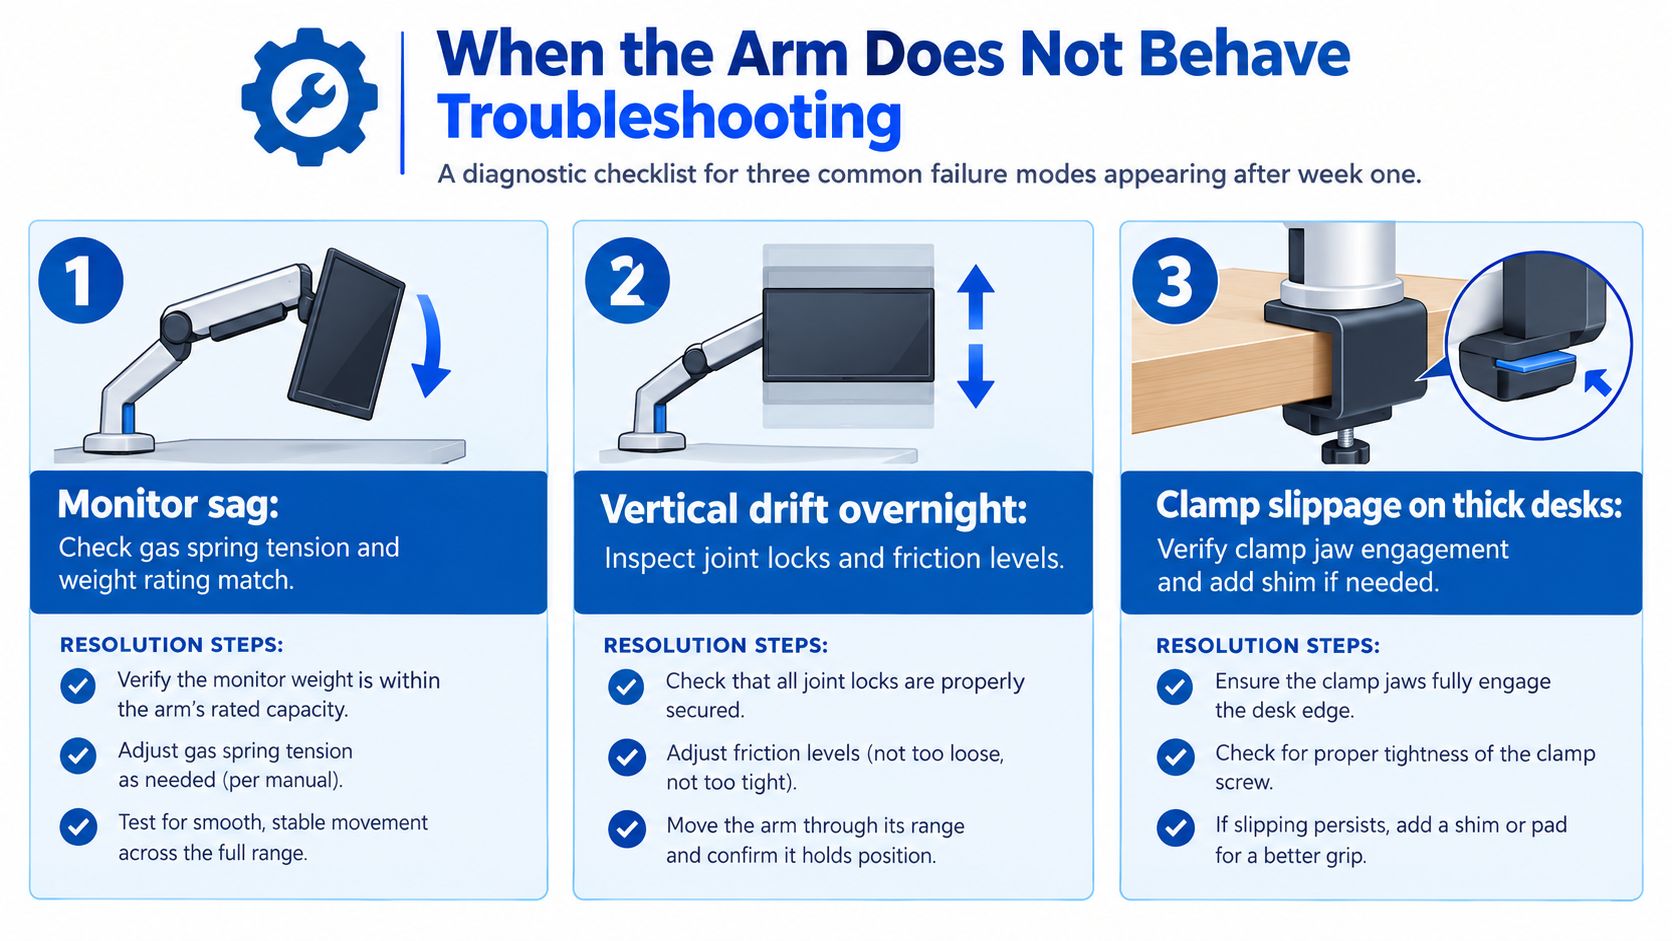
The common assumption is that a sagging monitor needs a stronger arm. Often, the underlying problem is that the spring tension was never calibrated with the actual monitor attached. A display can meet the headline load rating and still sit poorly if accessories, the VESA plate, and the screen's center of gravity push the joint toward its limit.
Sagging under the display
Leave the monitor at working height and adjust the gas-spring tension in small increments. Use the supplied hex key, keep one hand supporting the display, and wait for the mechanism to settle before judging the result. If the arm still falls, remove accessories and compare the installed load with the manufacturer's usable range, not merely its maximum headline figure.
Stop adjusting if the tension screw bottoms out, feels stripped, or requires force beyond the manual's guidance. At that point, contact the manufacturer rather than adding improvised washers or counterweights.
Vertical drift
If the screen is lower the next morning, inspect the joint lock, friction control, and gas-spring adjustment. A low-cost arm may appear balanced when stationary but drift because its friction ring or counterbalance component is slipping.
Test the display at the height you use most, then leave it untouched and check whether the position changes. If the joint has play, grinding, or inconsistent resistance, replacement is safer than repeatedly tightening the visible knob.
Clamp movement
Clamp slippage usually points to poor jaw engagement, a compressed pad, an obstructed underside, or an edge that isn't flat. Release the clamp, inspect the contact surfaces, and check whether the lower jaw is sitting against the desktop rather than a cable tray or decorative lip.
A thin protective shim can distribute pressure on a vulnerable surface, but it shouldn't compensate for an unsuitable desk edge. If the desk material is crushing, cracking, or visibly deforming, stop using the arm and switch to a suitable grommet or reinforced mounting solution.
Useful tools include the supplied hex key, a tape measure, a flashlight, and a level. You shouldn't need to improvise a longer lever or force a joint into position. The PAS framework is often used in problem-solving communication because it names the problem, shows the consequence, and presents the solution. That same sequence works for troubleshooting, but the physical fix still has to respect the manufacturer's limits.
People Also Ask
Can a monitor arm damage a desk?
It can, especially when a clamp concentrates force on a thin, soft, glass, beveled, or unsupported edge. Check the desk material, contact area, and mounting instructions before tightening.
Why does my monitor arm keep dropping?
The installed load may be too close to the arm's limit, or the spring tension may be unbalanced. Recheck the complete load and adjust tension gradually with the monitor attached.
Is a grommet mount more stable than a clamp?
A grommet can provide better load transfer when the desk edge is unsuitable or the display is heavy, but only if the hole, sleeve, backing plate, and desktop construction are appropriate.
DigiDevice offers practical desk and PC accessories, including cable-management items and workspace hardware that can complement a carefully measured monitor arm setup. Visit DigiDevice to compare relevant tools and accessories before you finalize your workstation.