

Phone Stand for Video Recording: A Practical Buying Guide
You're halfway through a recording, your phone is leaning against a coffee mug, and the frame has slowly tilted toward the ceiling. The charging cable is tugging the handset sideways, your microphone lead is hanging across the shot, and the phone is getting hot on the desk.
A phone stand for video recording fixes more than shaky footage. The right stand establishes a fixed camera position, keeps framing repeatable, leaves room for lighting and audio, and lets you record hands-free without rebuilding the setup every time. This guide is updated for March 2026 and focuses on the parts that matter: height geometry, reach, base stability, cable routing, heat, mounting, and your real creator workflow.
Why the Right Phone Stand Changes Your Recordings
A makeshift setup can work for one clip. It breaks down when you need consistent framing across tutorials, product demonstrations, livestreams, or talking-head videos.
The problems usually arrive together. A phone held in one hand introduces small movements that become obvious in close-up footage. A handset placed flat on a desk produces a low angle that can crop your face, show too much ceiling, or make your workspace dominate the frame. Add a microphone, case, charging cable, or small light, and a weak mount starts rotating or tipping.
The stand becomes the reference point for the entire recording system. Once the camera stays fixed, you can position your key light, place a microphone close to the subject, and return to the same composition for another take.
Practical rule: If you keep correcting the phone instead of performing, the stand is part of the problem.
Stability affects more than sharpness
For video, stability isn't only about stopping a dramatic fall. Table taps, floor resonance, wind, and accessories attached to the phone create micro-movement that makes footage look unsettled. Guidance from Ulanzi's phone stability guide emphasizes a wider stance, rubberized feet, a lower mount position, and keeping added accessories close to the tripod's center to reduce leverage.
The same principle applies indoors. A narrow base may hold an unloaded phone, but a tall extension with a light and microphone creates a tipping risk. The stand must remain balanced at the height and reach you use, not only at its shortest setting.
Framing determines whether you can work
A camera placed near eye level reduces neck flexion and gives talking-head footage a natural axis. Independent testing covered by TechGearLab's phone stand guide highlights adjustable height and angle as important because creators can change framing without moving the base.
That matters during a real shoot. You shouldn't have to shift a tripod every time you move from a seated explanation to an overhead product demo. Choose the stand around the hardest shot in your workflow, then use its lower positions for simpler recordings.
The global category has grown because smartphone video has moved into everyday work for vloggers, educators, marketers, and streamers. Market estimates place phone tripod and stand products in the low single-digit billions of U.S. dollars, with forecasts showing continued growth from the mid-2020s into the early 2030s, as summarized by 360iResearch's phone tripod market analysis. The useful takeaway isn't the forecast itself. It's that a stand is now ordinary production infrastructure, not a niche camera accessory.
For lighting placement, pair the stand decision with this guide to choosing lighting for photography. The stand is the foundation, but the recording system succeeds only when camera, light, audio, power, and heat work together.
The Five Main Types of Phone Stands Explained
Start with the shot, not the product listing. A stand that works beautifully for a seated livestream may be useless for walking footage or overhead art recording.
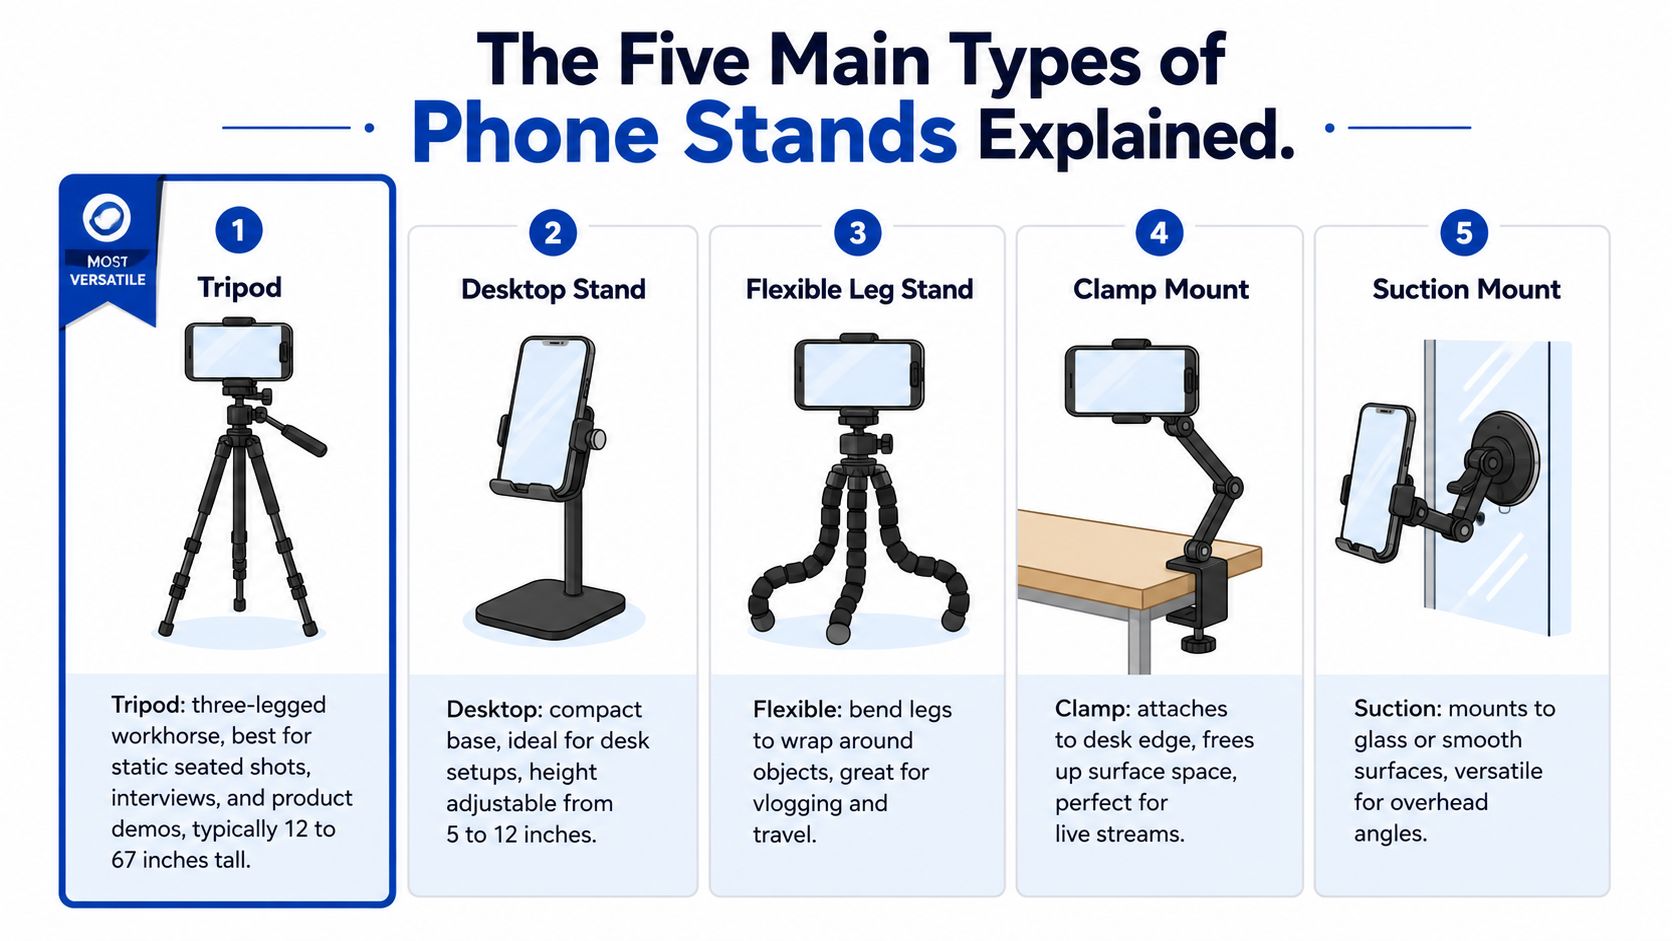
Tripods
The tripod is the general-purpose choice for static recording. Three legs spread the load, and a height-adjustable center section lets you move between desk-level framing and standing shots. It suits solo vlogs, interviews, demonstrations, and fitness content where the camera stays in one place.
The limitation is footprint. Tripod legs occupy floor or desk space, and a lightweight model can become unstable when fully extended or loaded with accessories.
Clamps and mounts
A clamp attaches to a desk edge, pole, shelf, handlebar, or other compatible surface. It's useful for livestreams, point-of-view footage, and cramped workspaces because it can free the main desk surface.
The trade-off is surface dependence. A clamp needs a suitable edge, and excessive arm reach can make the phone vibrate or pull the mount loose.
Gimbals
A gimbal uses powered motors to stabilize movement across multiple axes. It's the right tool for walking tours, tracking shots, event coverage, and cinematic movement where a fixed stand can't follow the subject.
Gimbals demand charging, balancing, pairing, and a little practice. They also solve motion stability, not every desk-recording problem.
Desktop mounts
A desktop mount uses a short arm or adjustable stem with a weighted base. It fits seated talking-head work, streaming, video calls, and small product demonstrations.
Its honest weakness is reach. A compact base won't replace a tall tripod for standing shots or full-body framing. Desk models commonly provide a modest lift, while broader recording stands can extend higher, as noted in TechGearLab's independent stand coverage.
Flexible and gooseneck stands
Flexible stands use bendable legs or an adjustable arm to reach unusual angles. They're especially practical for overhead cooking, piano keys, craft work, bed-level recording, and travel.
Flexibility has a cost. The arm can sag, bounce, or slowly drift when the phone, case, microphone, and light create too much strain. For overhead examples and mounting ideas, use this overhead camera mount guide for unboxing videos.
Choose a tripod for repeatable general recording, a desktop mount for a fixed desk, a clamp for limited surfaces, a gimbal for movement, and a flexible stand for awkward angles. Don't buy a flexible mini-stand and expect it to behave like a rigid studio support.
Key Features That Actually Decide Performance
Product pages often lead with folded size, phone compatibility, or a remote shutter. Those details matter, but they won't save a stand whose head drifts when you add a microphone and charging cable.
Read the mount and balance as one system
A spring-loaded clamp is quick, but its grip depends on jaw tension and phone thickness. A screw-tightened mount gives more control, while a magnetic MagSafe-style mount is fast and clean when your case supports it. Check whether the holder clears your case, cage, wireless receiver, and side charging port.
A quarter-twenty thread, cold shoe, or similar accessory interface expands the stand's usefulness. It lets you attach a microphone, LED panel, or small monitor without hanging everything from the phone itself.
Six features worth checking
| Feature | What to Look For | Recommended Range | Real-World Trade-off |
|---|---|---|---|
| Stability | Wide legs, rubber feet, weighted base, counterbalance hook | Base should remain planted at your maximum working height | More stability usually means more weight and less portability |
| Mount type | Secure clamp, case clearance, magnetic compatibility, accessory threads | Match the mount to your phone, case, and microphone setup | Fast magnetic mounting can sacrifice universal compatibility |
| Compatibility | Phone width, case depth, portrait rotation, accessory clearance | Confirm the complete loaded setup, not the bare handset | Larger cases and cages reduce usable clamp range |
| Height and angle | Independent tilt, pan lock, portrait rotation, center-column control | Buy for the tallest or most awkward shot you regularly record | Maximum extension can increase vibration and leverage |
| Portability | Folded length, total weight, carry case, setup speed | Small enough for your actual daily bag | Lighter stands can be less forgiving outdoors |
| Material | Aluminum, carbon fiber, reinforced plastic, metal hardware | Match stiffness to extension and load | Plastic keeps prices down, while metal generally adds rigidity and weight |
The recommended range in that table is intentionally practical rather than a universal specification. A short desk stand doesn't need the same structure as a full-height tripod. What matters is whether the base, head, and mount remain stable at your chosen height with every accessory attached.
The failure test: Mount your phone, case, cable, microphone, and light before judging the stand. A bare-phone test tells you almost nothing about a real recording.
Locking hardware beats decorative specifications
Independent pan and tilt locks are more valuable than a long feature list when you record static scenes. A head that slowly droops can ruin a take even if the legs never move.
Material also changes the experience. Aluminum gives a useful balance of stiffness and cost. Carbon fiber suits creators who carry gear often. Reinforced plastic can be perfectly sensible for a compact desktop base, but it needs enough mass and a broad enough footprint to resist tipping.
Matching Height and Reach to Your Recording Setup
The correct height is a geometry problem. Your body position, desk depth, lens location, and subject area determine the stand category before brand or material enters the decision.
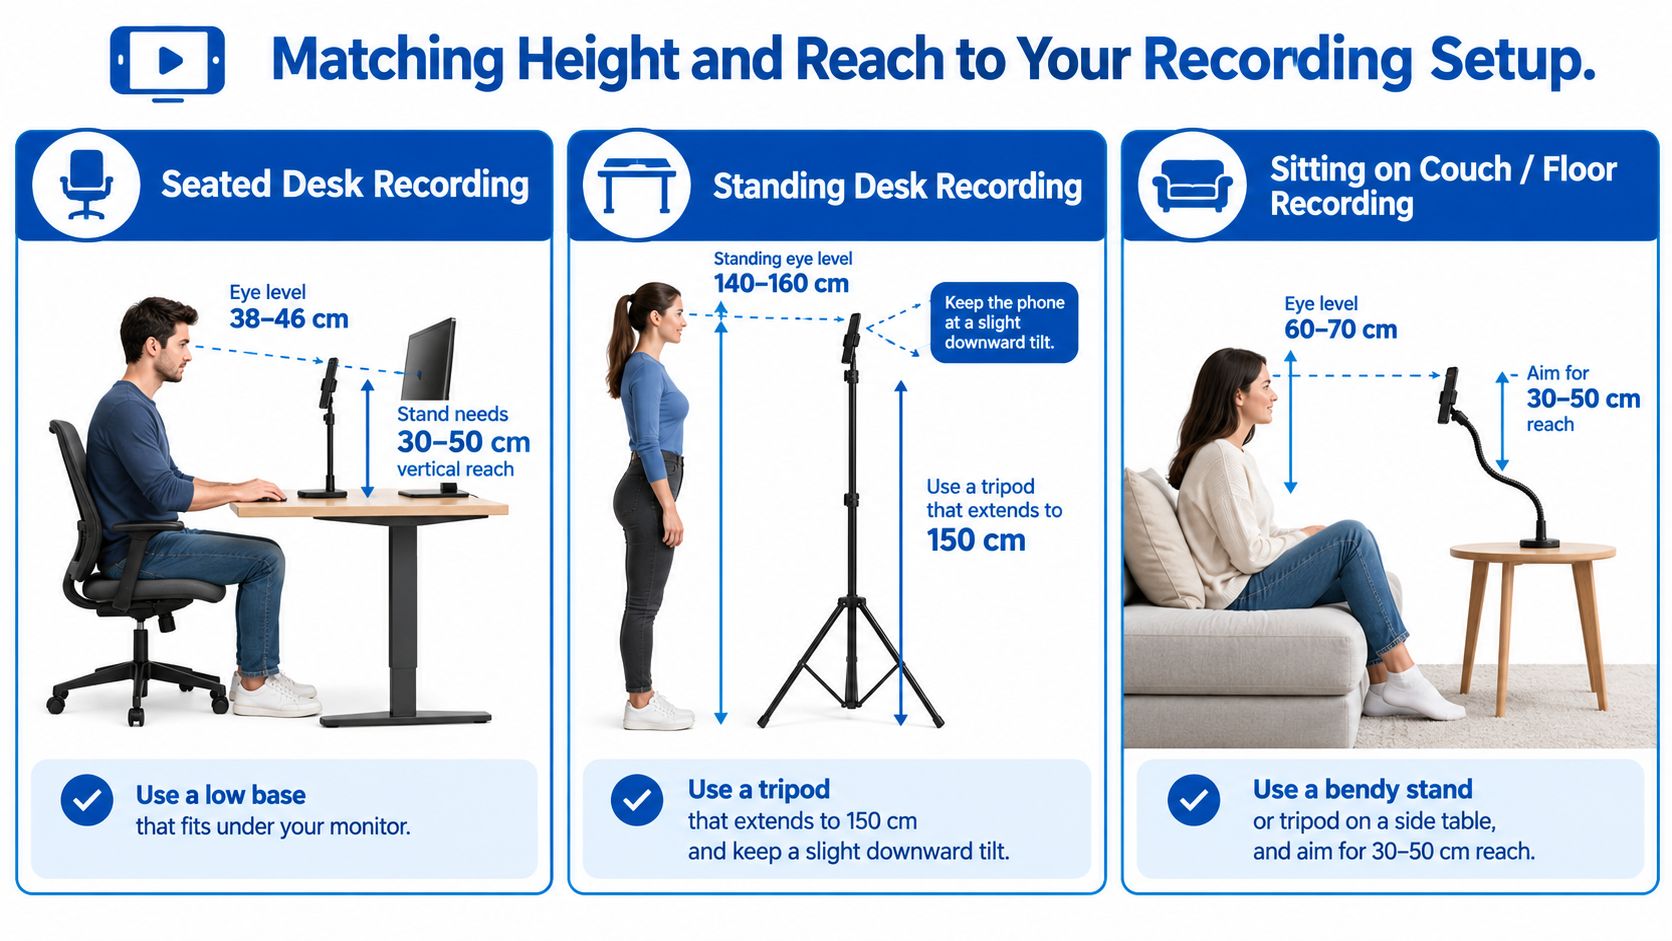
Seated desk recording
For seated work, eye level commonly falls around 38 to 46 cm, and the stand needs roughly 30 to 50 cm of vertical reach from a low base. Those setup dimensions are included in the provided creator-focused geometry guidance at Teleprompter Works.
A low desktop base should fit beneath or beside a monitor without forcing the phone too far forward. If the base blocks your keyboard or pushes the camera into the monitor, choose a clamp or an arm with controlled horizontal reach.
Standing talking-head footage
Standing shots need a tall support. The provided setup guidance places standing eye level around 60 to 67 inches, while the infographic's practical comparison uses a standing eye-level range of 140 to 160 cm and a tripod extending to 150 cm. Keep the phone slightly tilted downward when the stand sits below eye level, but don't aim so steeply that the frame feels top-heavy.
For a suitable starting point, consider DigiDevice's 100 cm phone tripod with Bluetooth remote for seated or lower-position recording. It isn't a substitute for a tall full-body tripod if your lens must sit at standing eye level.
Overhead and floor-level work
Overhead desk recording needs horizontal reach as much as vertical height. The supplied creator guidance recommends at least a 14-inch gooseneck for reaching the center of a desk without placing the base in the frame, while broader overhead setups may require a horizontal reach of 50 to 80 cm and a camera position 60 to 90 cm above the subject.
As the arm extends, cable weight and accessory leverage become more noticeable. Route the charging cable along the support, keep the microphone near the head, and check for heat when the phone runs a bright display during a long take. A flexible arm that looks impressive on the product page may still drift once the entire recording system is attached.
Setup and Shooting Tips for Cleaner Phone Video
A good stand still needs a disciplined setup. I use a short pre-recording check because most ruined takes come from small avoidable changes, not from the camera sensor.
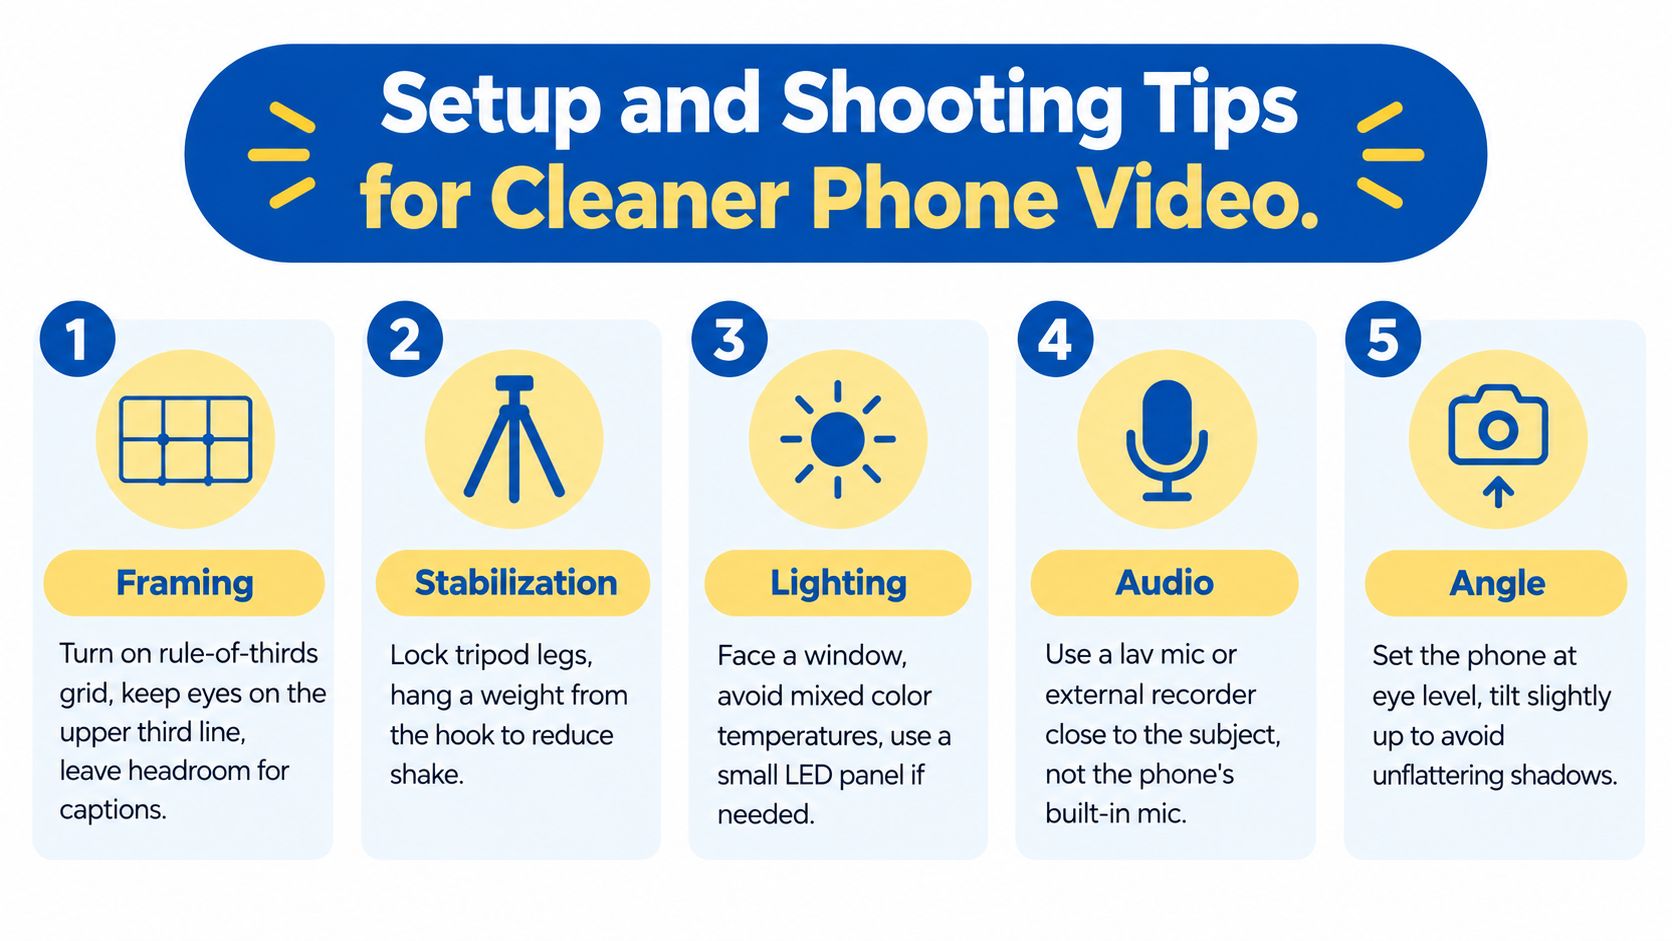
Build the frame first
Turn on the rule-of-thirds grid. Keep your eyes near the upper third line, leave room above your head for captions, and check the edges for cables, light stands, and distracting background objects.
Set the phone at eye level for a natural talking-head angle. For a desk demonstration, lower the lens enough to show the working surface without allowing the stand base to intrude.
Lock movement before you press record
Lock the tripod legs and tighten every head control after framing. Outdoors, hang a small weight from the center hook when the stand supports one, and avoid extending the center column beyond 70 percent unless you can brace it, as this is a practical stability rule for reducing tilt.
For audio, attach the microphone to the tripod head or a nearby accessory mount instead of leaving it suspended from the phone. That keeps the cable path cleaner and reduces the chance that the lead pulls the handset sideways.
Lighting should sit about 45 degrees off-axis and slightly above eye level. Watch for reflections from monitors and glasses in desktop setups. If you're balancing cost and quality, this budget-friendly video lighting guide offers useful context before you add more equipment.
Use simple hands-free controls
Pair a Bluetooth remote, use an Apple Watch camera shortcut where supported, or rely on the camera button available through your phone and recording app. Start a short test clip, walk through the movement, and inspect the frame before recording the full take.
Small fixes help:
- Tighter clamp: Add a rubber band around the clamp jaw only when it doesn't obstruct the phone or create uneven pressure.
- Cleaner cables: Use a binder clip as a temporary cable manager on the stand leg or arm.
- Fill light: Mount a small LED panel on the stand's cold shoe, then check that its weight doesn't make the head drift.
For a broader comparison of lighting shapes and placement, see DigiDevice's portable ring lights versus softboxes guide.
A quick visual reference can help you refine the setup:
Choosing the Right Stand for Your Creator Workflow
The right choice depends on where the stand lives and what you attach to it. A solo vlogger needs fast repositioning. An online teacher needs a stable desk geometry. A mobile journalist needs movement control and compact storage.
Use the budget tiers below as editorial starting points, not promises about a particular product's performance.
| Creator Persona | Recommended Stand Type | Key Specs | Budget Range |
|---|---|---|---|
| Solo vlogger | Lightweight tripod with fluid head | Quick height changes, portrait rotation, remote shutter | $25 to $60 |
| TikTok and short-form creator | Flexible gooseneck with weighted base | Compact footprint, adjustable angle, secure case clearance | $15 to $35 |
| Online teacher and webinar host | Desktop clamp with overhead arm | Cable clearance, stable arm, microphone mounting | $40 to $90 |
| Fitness and outdoor creator | Heavy-duty tripod with fluid head and gimbal-friendly mount | Broad base, locking head, strong extension | $70 to $150 |
| Mobile journalist | Gimbal with tripod legs | Motorized stabilization, quick setup, travel support | $100 to $250 |
Those budget ranges come from the planned buyer framework, but the decision should still start with three questions:
- Where does the lens sit relative to your eyes? A low lens makes a seated shot look wrong, while an overextended arm can make an overhead shot unstable.
- How much weight is already on the mount? Count the phone, case, microphone, light, cable, and any magnetic adapter.
- Will it travel daily or stay in one room? A rigid stand is often the better choice for long-form desk recording, while a lighter model makes sense when every item goes into a small bag.
My blunt recommendation: Buy the heaviest stable stand you'll actually carry. A technically excellent support left at home is less useful than a compact model that matches your routine.
A creator comparing the stand with microphones, lights, and editing software may also benefit from this roundup of best tools for creators in 2026. For TikTok and Reels workflows, DigiDevice's budget vlogging kits guide provides a natural next step when the stand is only one part of the setup.
The market context supports a phone-first approach. One 2025 breakdown estimated smartphone tripods at 27.8% of the global tripod market, compared with 32.4% for camera tripods, and projected smartphone tripods to grow at an 8.2% CAGR through 2034, while camera tripods were projected at 4.8%, according to The Business Research Company's phone tripod report. Smartphone tripods were listed in roughly the USD 15 to USD 150 range, while professional camera tripods were listed around USD 200 to USD 2,500 in the same source. The practical conclusion is simple: phone support has become a substantial recording category, but you still need to match the build to the shot.
Quick Answers to Questions Creators Ask Next
Can I use a tripod at events and public venues?
Only if the venue allows it. Event organizers may restrict tripods because legs occupy walkways, block sightlines, or create a safety issue. Ask before setting up, keep the footprint out of traffic, and use a compact clamp or desktop-style mount when venue staff prohibit floor-standing equipment.
A suction mount isn't automatically acceptable either. It needs a clean, smooth surface and permission from the property owner. Never attach equipment to a surface that could be damaged or that hasn't been approved for mounting.
How do I charge while recording?
Route the cable along the stand rather than letting it hang from the phone. A side-port clamp can work well if it leaves the charging socket unobstructed, while a mount with cable pass-through keeps the lead closer to the support.
Long sessions also create a heat problem. The phone may warm up from sustained recording, charging, a bright display, or an attached light. Keep ventilation around the handset, avoid covering heat-producing areas with a thick case when safe to do so, and test the full powered setup before an important take. Recent buying guidance has increasingly emphasized cable management, thermal tolerance up to 40°C, and tension retention for longer recordings, as discussed in Persistence Market Research's phone tripod coverage.
Is a phone stand ready for travel?
Check the folded length, packed weight, and whether the legs fit inside your actual carry bag. Airlines and venues can apply their own rules to tripods, selfie sticks, and other rigid equipment, so verify the current policy for your carrier and destination before departure.
For travel vlogs, a flexible stand or gimbal with integrated tripod legs can reduce the number of separate pieces. For long-form recording, a rigid stand with a stable base is usually the safer choice, even when it takes more room. Portability should reduce friction, not force you to accept a mount that drifts during every take.
DigiDevice offers phone recording accessories alongside practical mobile power, mounting, and creator gear, including a 100 cm tripod with Bluetooth remote. Visit DigiDevice to compare the available options and build a phone-based recording setup around your actual height, reach, audio, lighting, and charging needs.